Documentation
How Ekua works
Every screen of Ekua, from first sign-in to the exported appraisal: where it is, how to use it and what to know. The images are the real platform.
Last updated:
Getting started
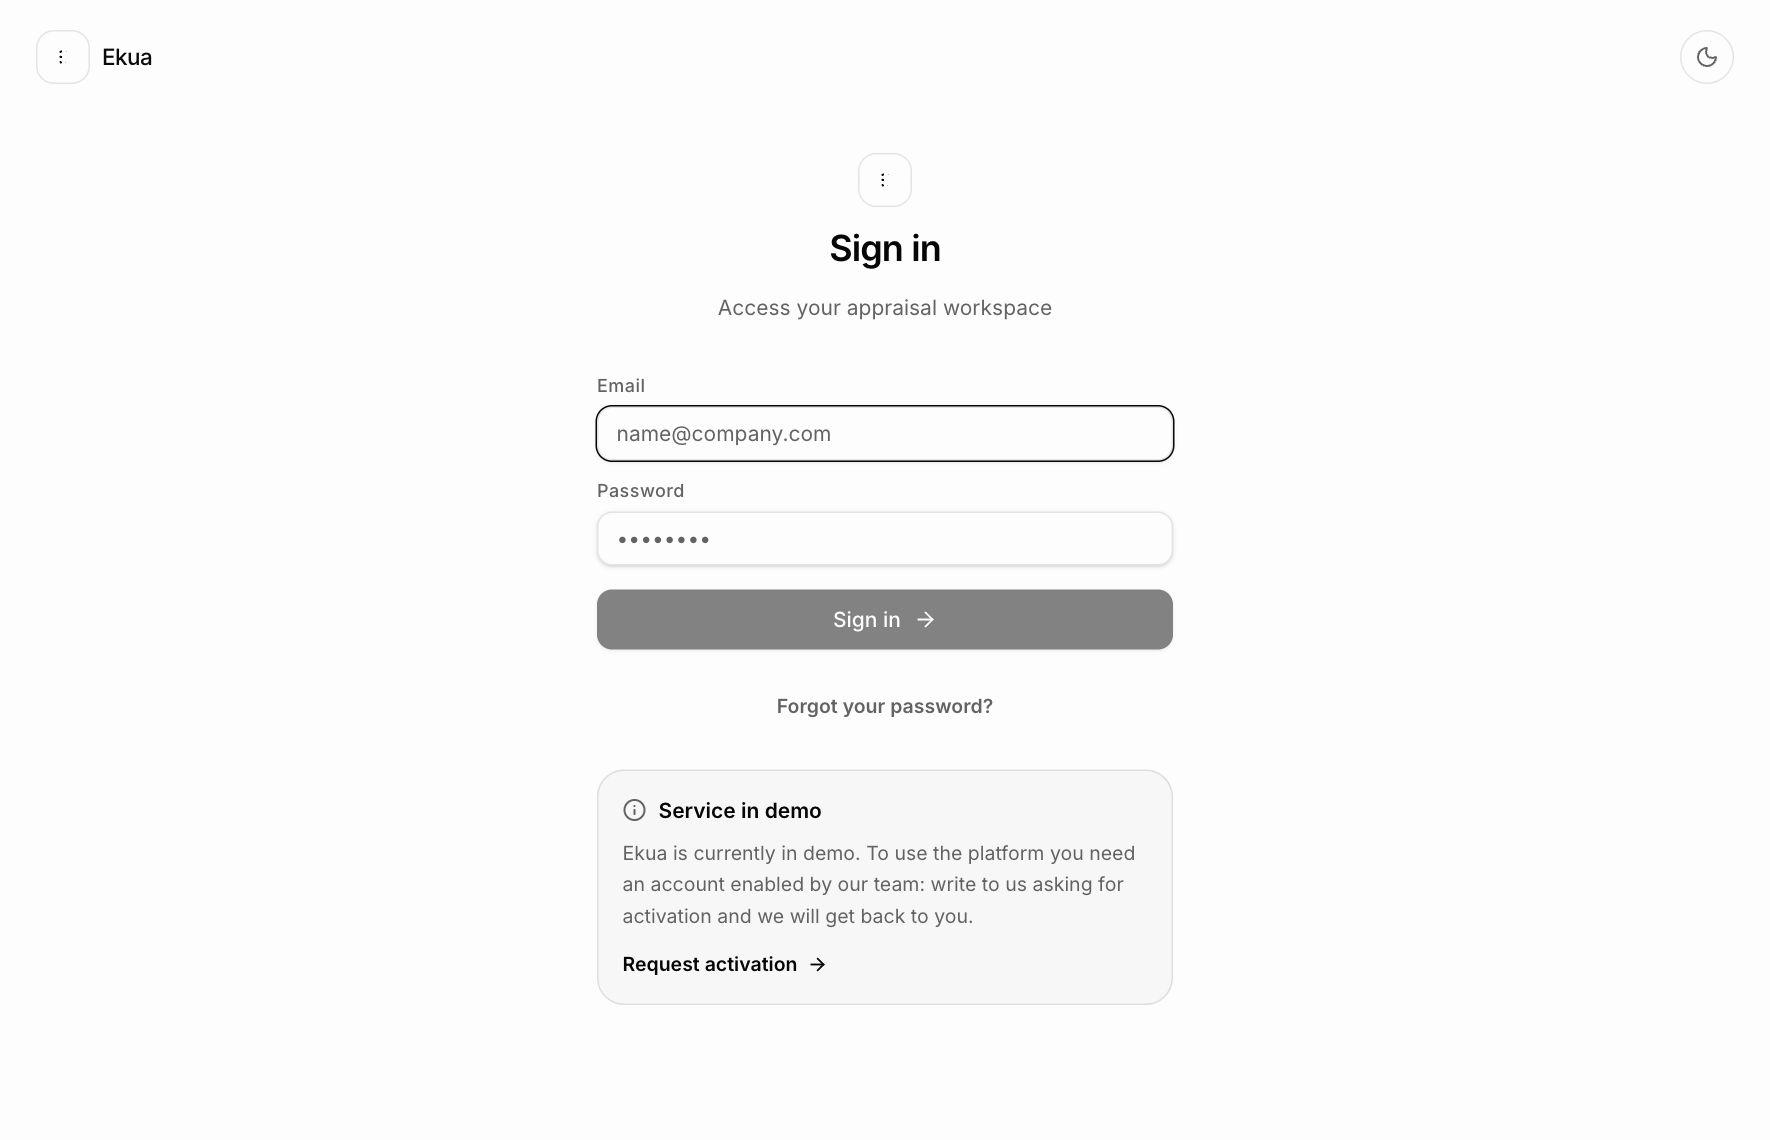
Sign-in
You sign in on ekua.app with the email and password of your Ekua account.
Where to find it
- ekua.app
- Sign in
How to use it
- 1
Open the sign-in page
On ekua.app press "Sign in" at the top right.
- 2
Email and password
Enter your account credentials and press Sign in.
- 3
Email code
The first time you sign in from a browser, a 6-digit code arrives by email. With "Trust this device for 60 days" that browser won't ask for it again.
- 4
Organisation
If you belong to more than one organisation, choose which one to enter: the list of its appraisals opens.
Good to know
- Forgotten your password? From "Forgot your password?" on the sign-in page you get an email with a link to choose a new one.
- Accounts are created from an invitation: without an active account the credentials won't work.
- In the browser a session lasts 8 hours, in the app 30 days. Signing out in one tab signs you out of the others too.
Mobile app
The Ekua smartphone app uses the same account as the web platform, and also captures 3D scans with augmented reality guidance.
Where to find it
- App Store or Google Play
- Ekua
- ekua.app/download
How to use it
- 1
Download the app
From the App Store or Google Play. At ekua.app/download your phone opens the right store directly.
- 2
Sign in
With the same account as the web platform: appraisals, scans, images and attachments are the same in the app and on the web.
- 3
Create an appraisal and scan
In the appraisal open Scans and start the scanner: augmented reality guidance shows where to move around the damage. A full pass usually takes 3–5 minutes.
What you'll find
3D scanner with AR guidance
Works on recent iOS and Android smartphones, with no LiDAR or external sensors. Every capture records time and location.
Uploads that don't get lost
Captures stay on the phone until the upload is confirmed: pending ones are shown at the top of the home screen, and if the app closes midway a notice says so when you reopen it.
Viewer and screenshots
The "Safe" badge is a reminder that the reconstruction comes from raw camera data and cannot be altered. A screenshot can be edited, saved to the appraisal gallery, attached or downloaded to your photos.
Credits
Credit packs are bought in the app, paid through the store, by administrators and appraisers. The same panel restores purchases.
Organisation templates
When you create an appraisal, your firm's templates appear too. In the app they are switched on and off; uploading and editing them is done on the web platform.
Real-time progress
Reconstruction percentages rise on their own, and a notice tells you when a scan is ready or has failed.
Export and guide
Appraisals export to PDF from the phone too. On your first appraisal a short guide introduces the four tabs.
Good to know
- The scanner captures with the phone held upright: landscape is on the way.
- The first sign-in from a phone asks for the email code; after that the phone is remembered.
- You can also scan from the phone's browser without the app, but without augmented reality guidance: see Browser scanning.
Home
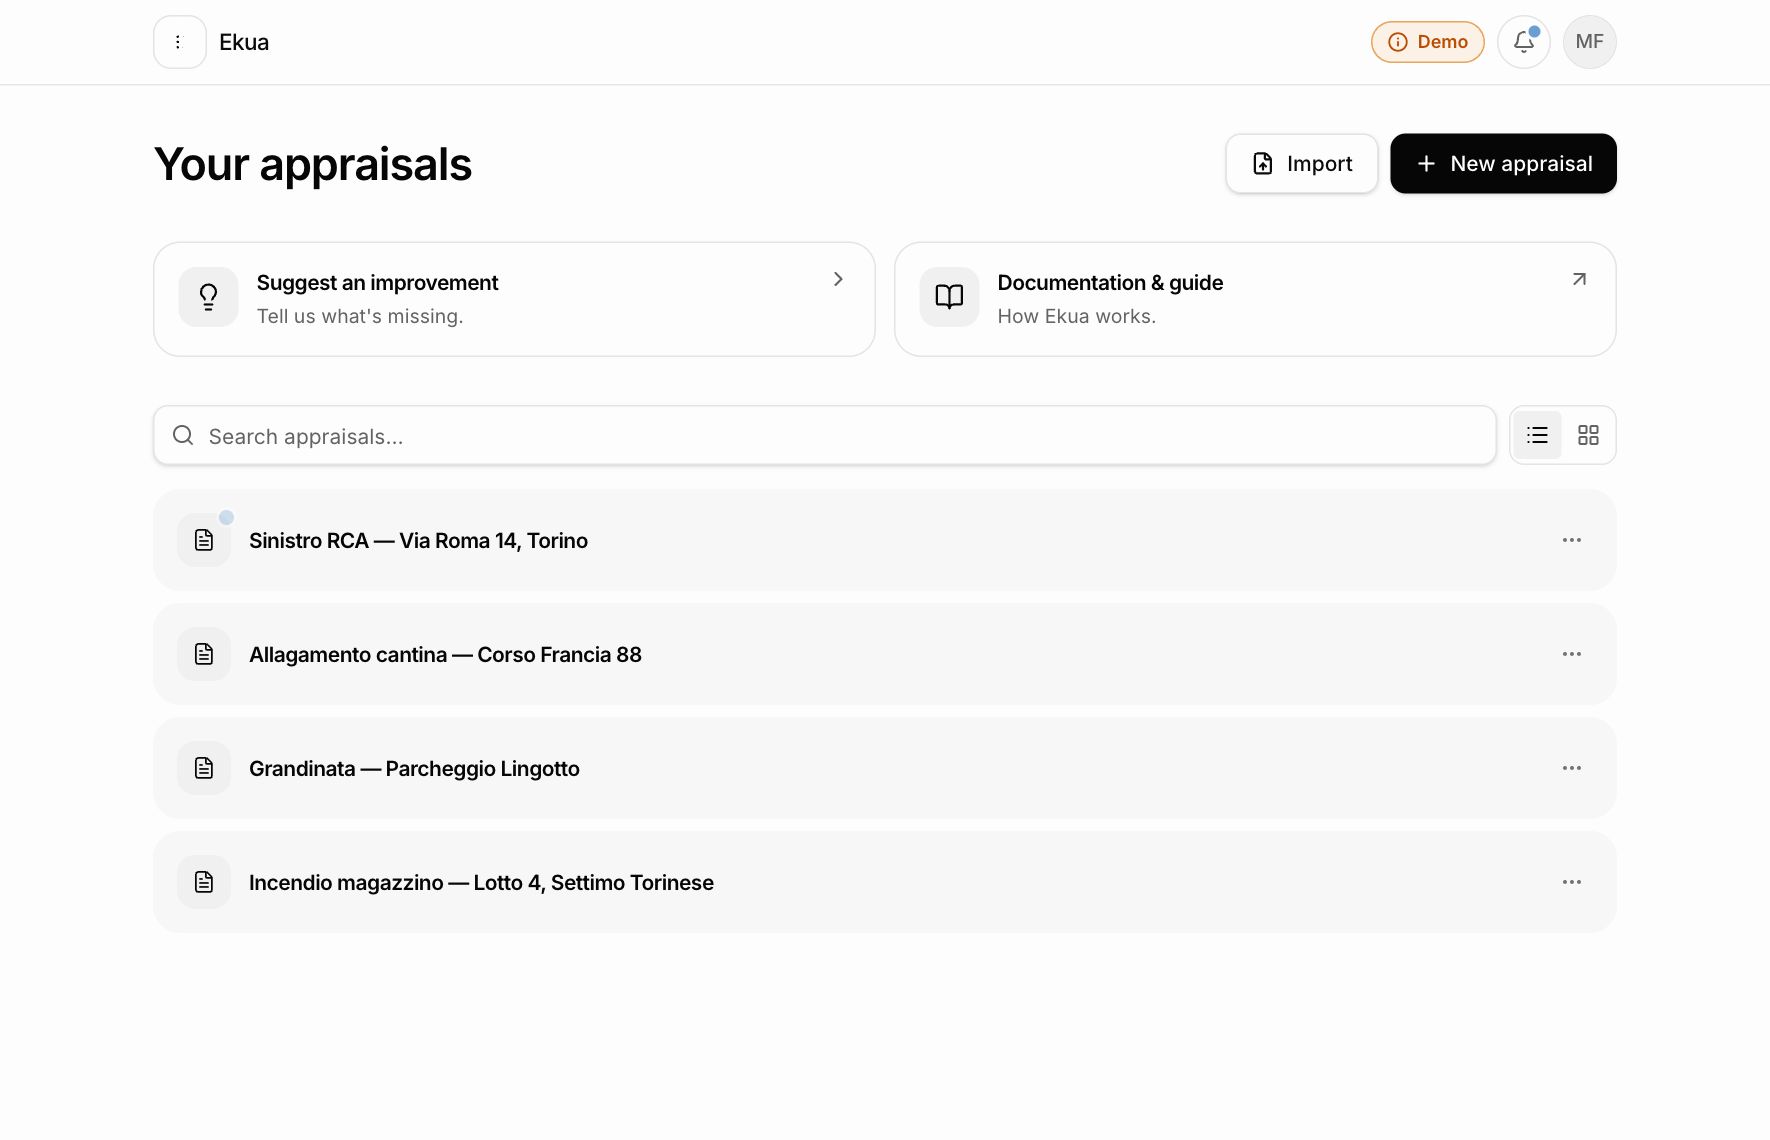
The list of every appraisal in the workspace, with the commands to create new ones.
Where to find it
- ekua.app
- Your appraisals
What you'll find
Search and view
Search filters by name as you type; the switch next to it toggles between rows and cards. Your choice is remembered.
Suggest and Documentation
Two tiles above the list: one to tell the Ekua team what's missing, the other opens this guide in a new tab.
Reconstructions in progress
A blue dot on an appraisal means one of its scans is being processed.
Opening
On desktop the appraisal opens in a side panel, with the list still visible behind it; on a phone it opens full page.
••• menu
On every appraisal (or with a right-click): share, export, rename and delete without opening it.
Top bar
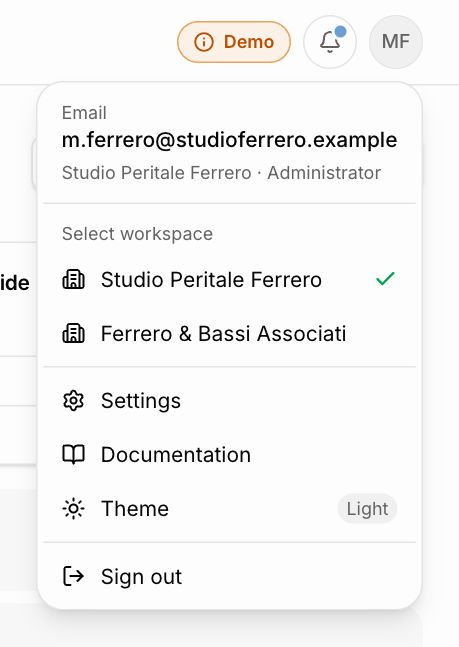
The Demo badge, the notifications bell and the account menu with organization switching, Settings, Documentation, light or dark theme and Sign out.
Import
Next to New appraisal: turns a Word, Excel or PDF document into an appraisal. Dragging a file onto the home page opens the same window. See Import an appraisal.
Good to know
- The first time, with an empty list, the home page offers the introductory guide and the creation of your first appraisal.
- The credit balance is in Settings.
Notifications and what's new
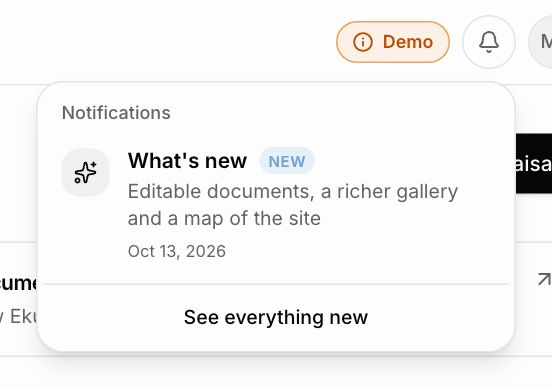
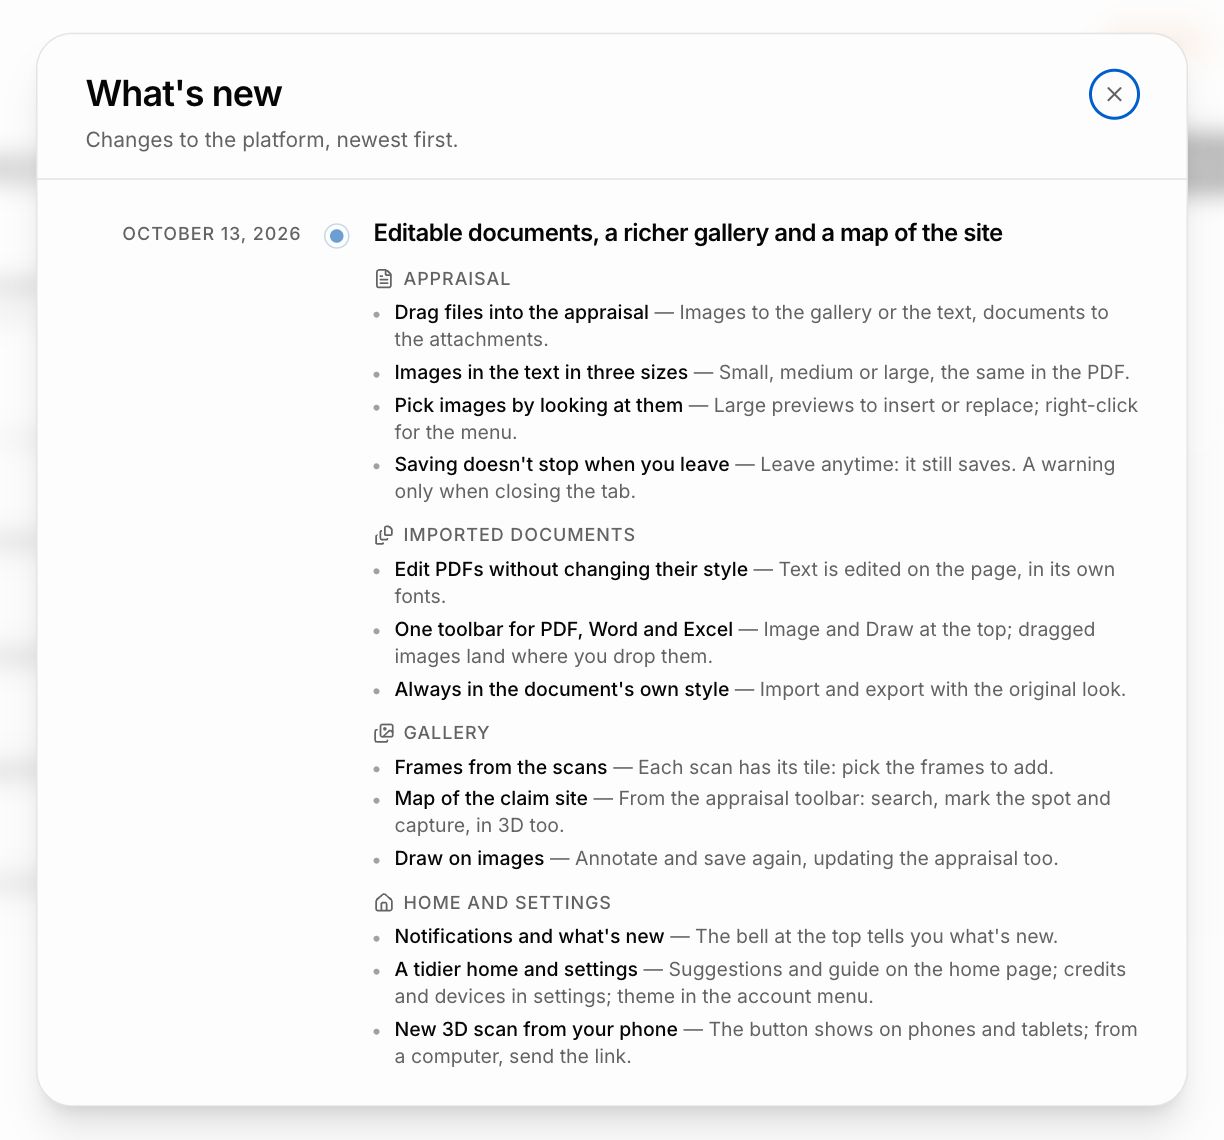
The bell at the top tells you what's new on the platform.
Where to find it
- Notifications
- What's new
What you'll find
Bell
A dot means there's something new; opening the menu clears it, and items that just arrived stay marked as New.
What's new
The notification opens the timeline of changes, newest first: for each date, the changes grouped by area, one line each.
Good to know
- Read notifications are remembered on this browser.
New appraisal
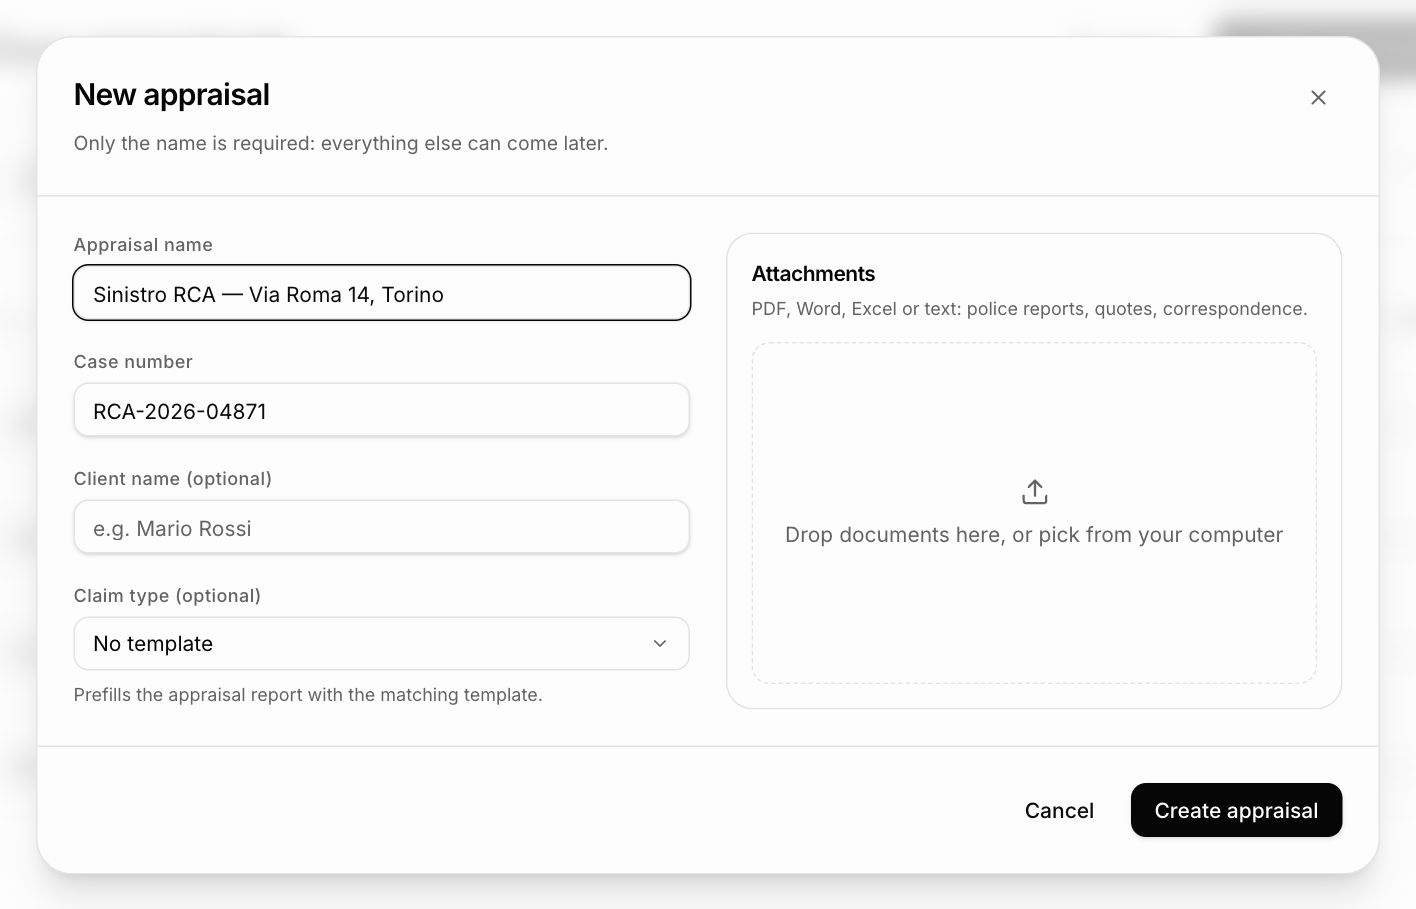
An appraisal gathers everything about a claim: text, scans, images and documents.
Where to find it
- Your appraisals
- New appraisal
How to use it
- 1
Appraisal name
Required: a name you will recognise, like "Motor claim — Via Roma 14".
- 2
Case number
Required too: the case reference. Within the same firm two appraisals can't share a case number.
- 3
Client name
Optional. If you also pick a type, the name goes into the appraisal text under "Insured".
- 4
Type
Optional. Prefills the text with the chosen template: motor damage, fire, theft and robbery, catastrophe, agricultural and hail, technology, general liability, road accident, police report, or one of your organisation's templates.
- 5
Documents
Drag into the right-hand column, or pick from your computer, PDF, Word, Excel or text files.
- 6
Create
The appraisal opens straight away; documents upload in the background, one after another.
Good to know
- Anything you leave out here can be added later from the appraisal.
- Template fields that can't be filled automatically are marked with dots.
Import an appraisal
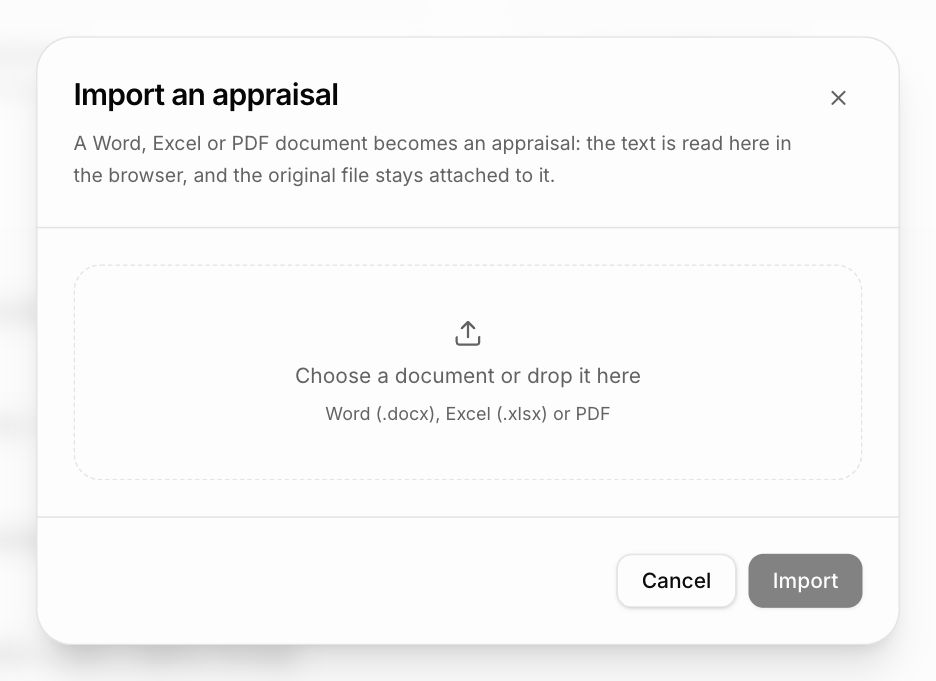
A Word, Excel or PDF document becomes an appraisal that keeps its own style, with the original file attached.
Where to find it
- Your appraisals
- Import
How to use it
- 1
Open
From the home page press "Import", next to New appraisal, or drag the file onto the home page.
- 2
Choose the document
Drag it into the box or pick it from your computer: Word (.docx), Excel (.xlsx) or PDF.
- 3
Import
The appraisal opens with the document in its own format and look, and the original file stays among the attachments. See Imported documents.
Good to know
- An imported appraisal is always exported in the format and style of the original document.
- A photo, or a document that's too blurry, can't be imported.
Appraisals
Appraisal
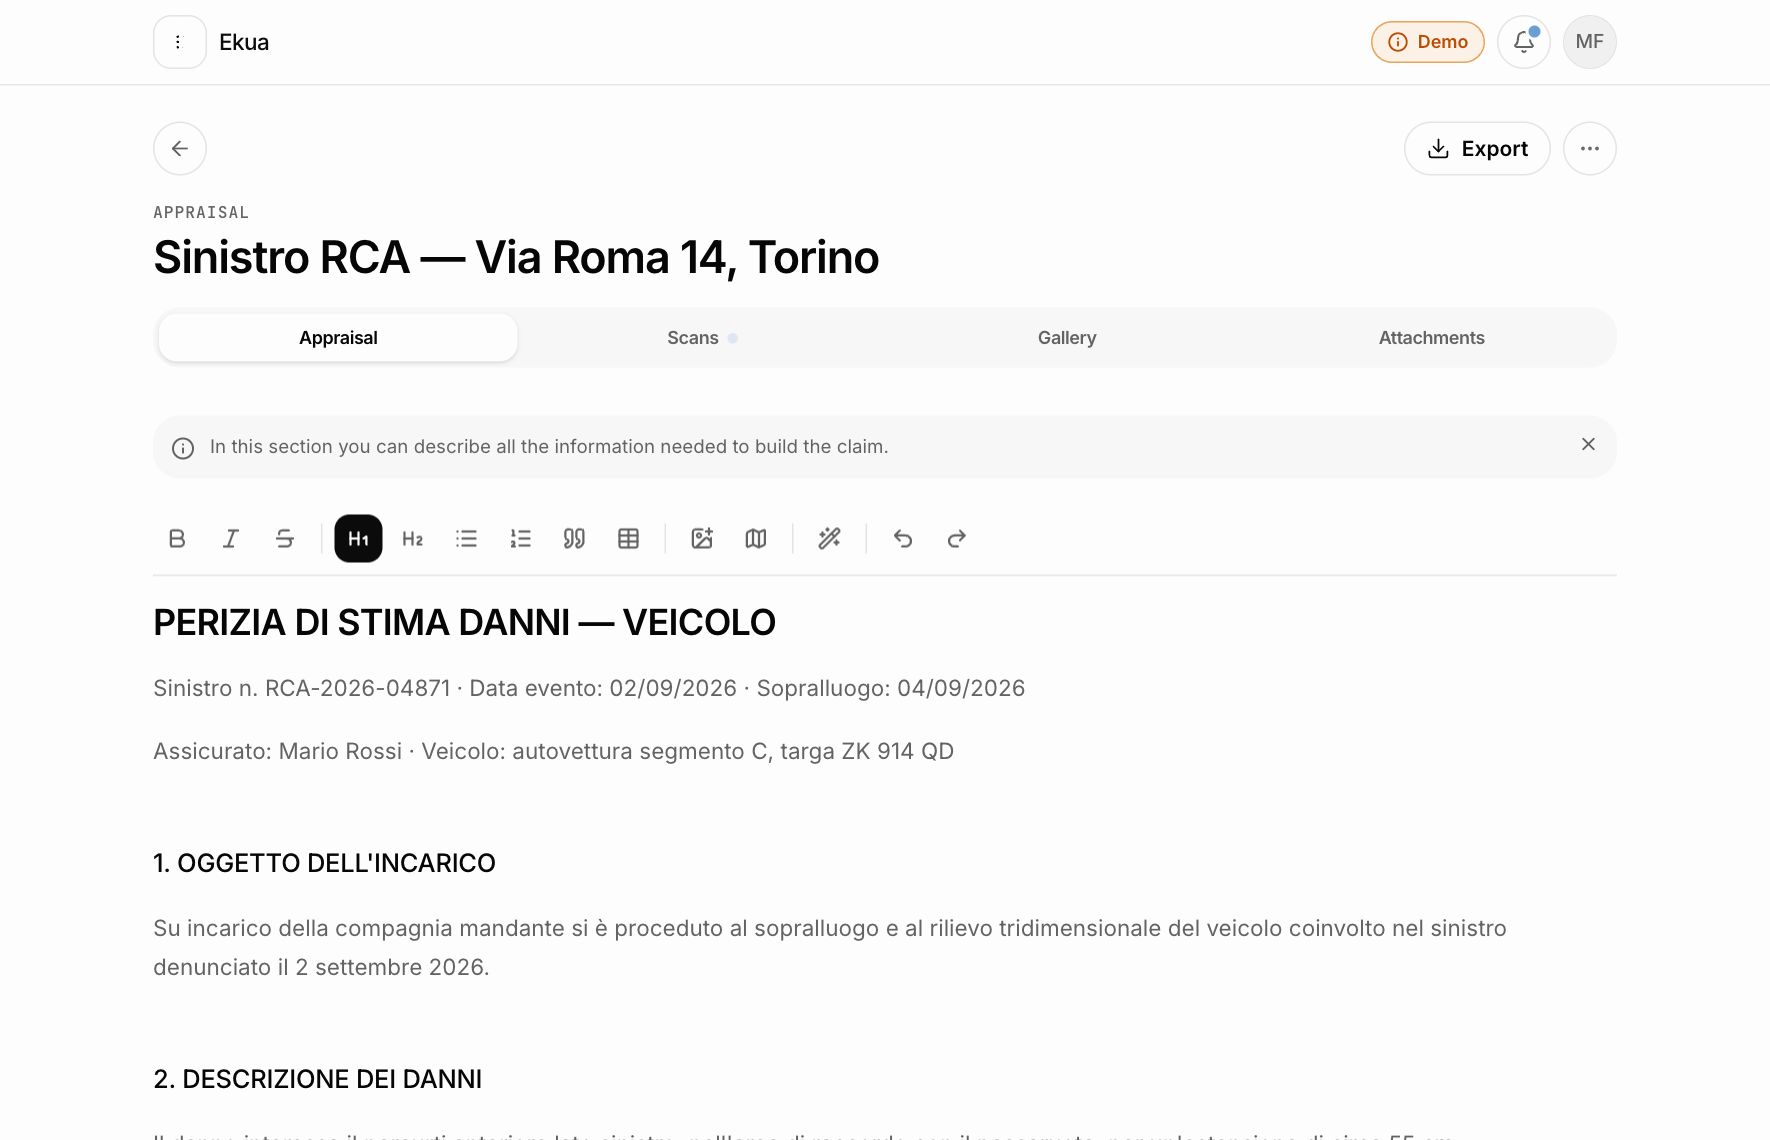
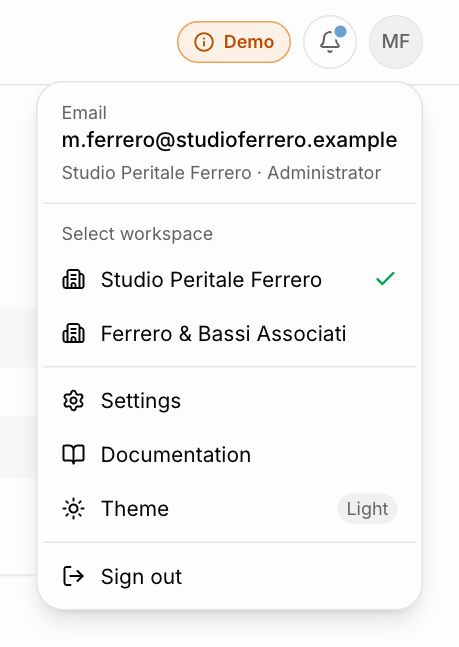
The header with its commands and four tabs: Appraisal, Scans, Gallery, Attachments.
Where to find it
- Your appraisals
- Open an appraisal
What you'll find
Export
Generates the appraisal PDF with text, scans and images, ready to send. An imported appraisal is exported in its original format.
Drag and drop
Drag documents from your computer onto any tab: they go to the attachments, and the appraisal opens the Attachments tab to show them. Images from your computer aren't uploaded: see Gallery.
••• menu
Share (copies the public link), Rename, Save as template, Suggest an improvement, Delete (with confirmation, can't be undone).
Tabs
The bar stays at the top as you scroll. The open tab is in the address: reloading or sharing the link brings you back to the same place.
Panel
Opened from the home page on desktop, the appraisal expands to full screen from the button at the top left.
Good to know
- The blue dot next to "Scans" means a 3D reconstruction is in progress.
- Share, Save as template and Delete are reserved for appraisers and administrators.
- Each tab has an info box that closes with the X and doesn't come back.
Text
The appraisal document editor. The one below is the real thing: try typing in it.
Where to find it
- Your appraisals
- Open an appraisal
- Appraisal
What you'll find
Ask the appraisal
The button at the bottom left opens a chat over the appraisal: a question about the text, like "What's the plate number?": the answer is always a piece of the text, and See source shows the line it comes from; Show in the text closes the chat and selects it in the document. The reading model downloads with the first question and runs in the browser: the text never leaves the device.
Automatic saving
Every change saves itself shortly after you stop typing, and finishes saving even if you go back to the home page. There's no Save button.
Formatting
Bold, italic, strikethrough, headings, lists and quotes from the bar at the top, which stays visible as you scroll.
Tables
From the table's ••• menu, or by right-clicking a cell, add or remove rows and columns, toggle the header or delete the table.
Images
The image button opens large gallery previews and the scans' Video tiles, to pick a frame from: one click selects, Insert confirms, a double-click does both.
Image sizes
Dragging the handle snaps the image to three sizes: small, medium or large at full width. The same are in the image's ••• menu (or right-click), where you can also replace or delete it.
Map of the site
The map button in the bar opens the map of the claim site. See Map of the site.
Good to know
- Ask the appraisal finds facts written in the text: it doesn't do calculations or answer yes/no questions. If the text has no clear answer, it says so.
- The text is what appears in the exported PDF and on the appraisal's public page: images come out at the same size.
- If you close the browser tab with a change not yet saved, the browser asks for confirmation.
Imported documents
An appraisal imported from PDF, Word or Excel is edited in its own format, without changing its style.
Where to find it
- Your appraisals
- Import
- Your appraisals
- Open an appraisal
- Appraisal
What you'll find
Ask the appraisal
The button at the bottom left opens a chat over the appraisal: a question about the text, like "What's the plate number?": the answer is always a piece of the text, and See source shows the line it comes from; Show in the text closes the chat and selects it in the document. The reading model downloads with the first question and runs in the browser: the text never leaves the device.
PDF
Click a piece of text on the page and type: changes use the document's own fonts and stay in place, even when viewing the whole page.
Word and Excel
They're edited as in their own programs: the document stays a .docx or an .xlsx.
Top bar
File name, save status and the Map of the site, Image and Draw commands, the same for all three formats.
Image
Picks a photo from the gallery and puts it in the document: on the visible PDF page, at the cursor in Word, on the selected cell in Excel.
Draw
Lines, arrows, rectangles, ellipses and freehand, with colors and widths: the drawing goes into the document as an image.
Frames in the document
From the Image button you can also pick a frame from a scan: it goes to the gallery and into the document.
Good to know
- Every change saves itself; exporting returns the document in its original format.
- In Word a dragged image goes where the editor puts it, usually at the cursor.
Templates
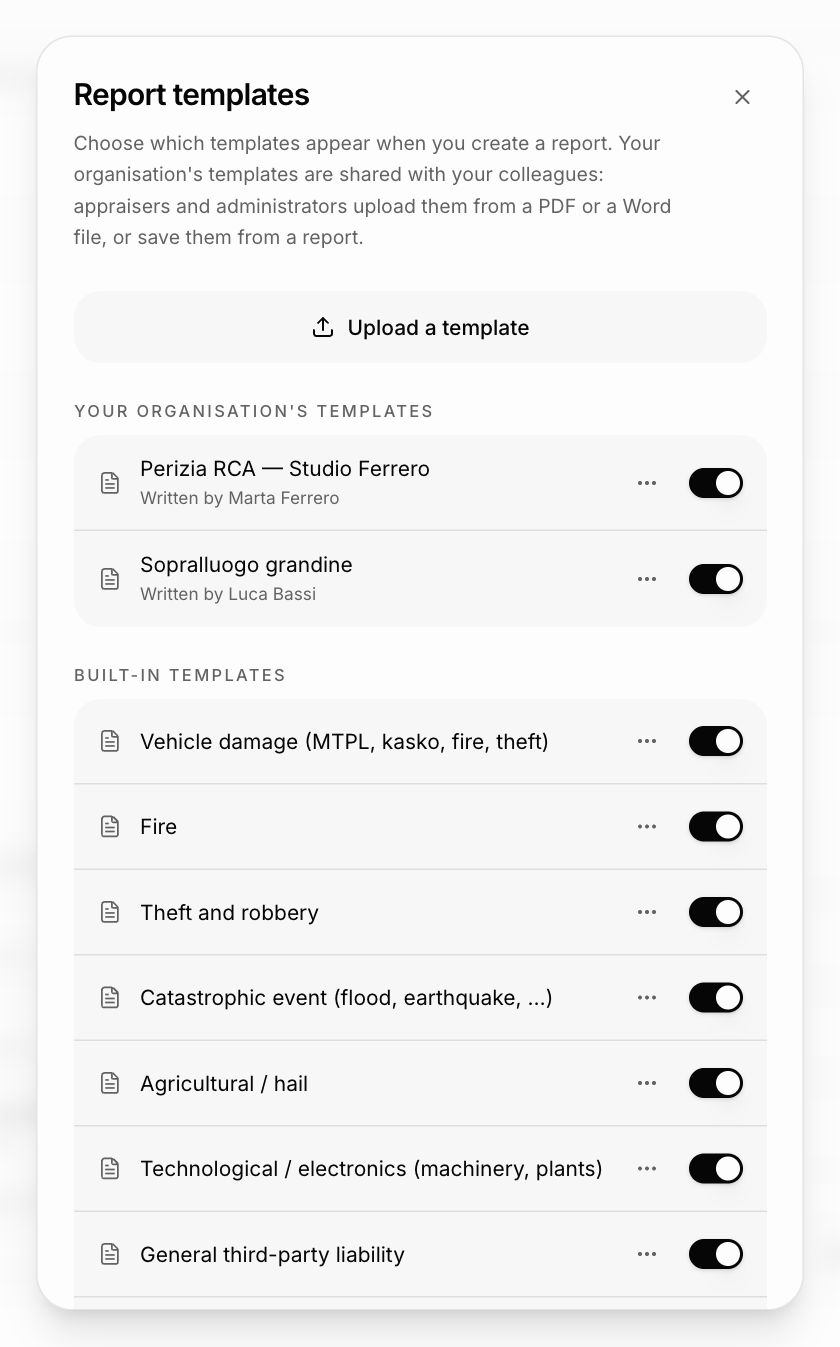
Starting texts that prefill a new appraisal based on its type.
Where to find it
- Account menu
- Settings
- Report templates
- Your appraisals
- Open an appraisal
- •••
- Save as template
What you'll find
Built-in templates
Nine templates for the most common types. The switch decides which ones appear when choosing a type.
Organisation templates
They are shared with the whole firm: a template a colleague uploads is there for you too, with the name of whoever wrote it.
Upload a template
From a PDF or Word file: the text is read, split into title and sections, and the fields to fill are recognised.
Save as template
From an appraisal's ••• menu, its current text becomes a new template.
Edit, rename, delete
Organisation templates open in the same editor as the appraisal.
Good to know
- A scanned PDF made only of images can't be imported: it needs a document with real text.
- Appraisers and administrators upload and edit templates; operators use them.
- Editing a template doesn't change the appraisals already created from it.
- The switches apply to you, in this browser: colleagues choose their own.
- In the app templates can be viewed and switched on, but not edited.
Gallery
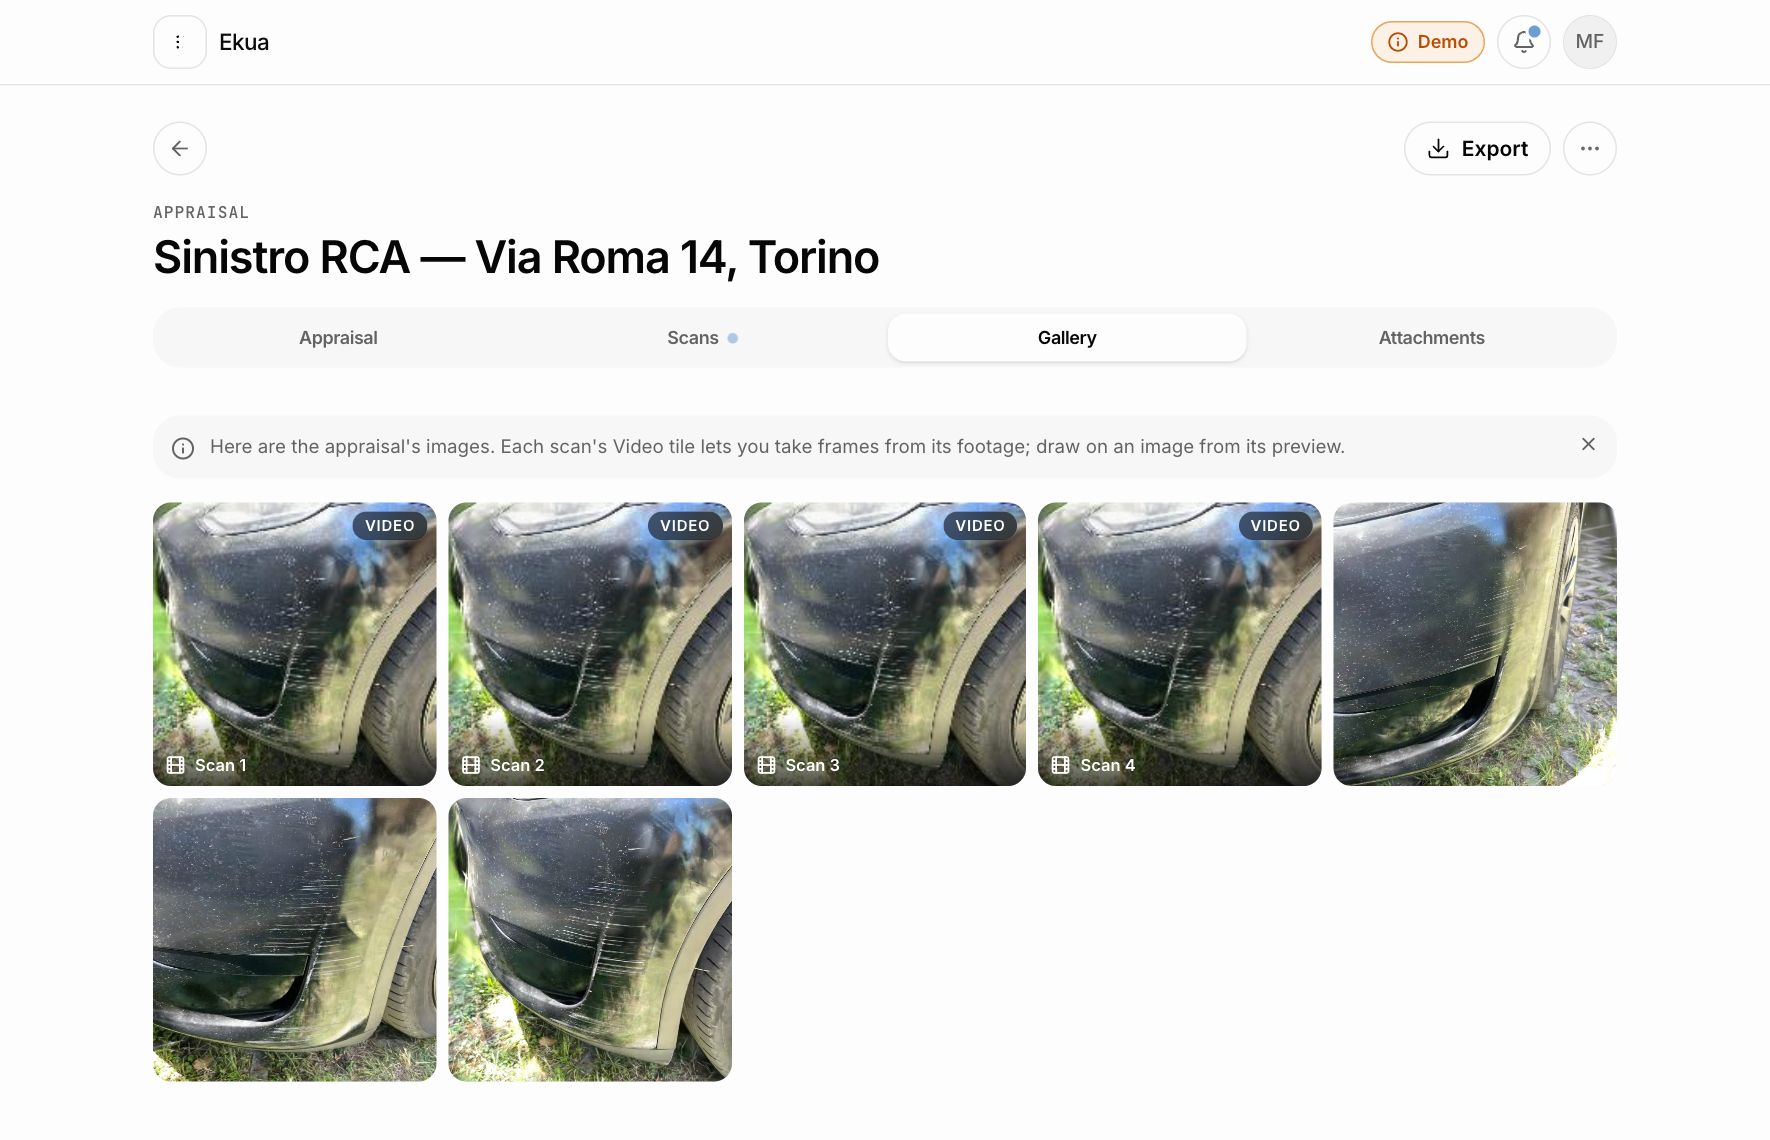
The appraisal's images: views from the 3D models, frames from the footage, maps and uploaded photos.
Where to find it
- Your appraisals
- Open an appraisal
- Gallery
What you'll find
Preview
Each image opens full screen and you can browse the others; clicking outside the image closes it.
Draw
From the preview you annotate the image freehand and save it again. If the image is already in the appraisal text, choose whether to update the text too or save without it: in that case the text loses the link.
Scan footage
Each scan has its own Video tile at the start of the grid: hovering it plays through the footage frames, opening it lets you pick which to add. See Frames from the scans.
Download and delete
From the image preview.
In the text and documents
Gallery images can be inserted into the appraisal text and into imported documents.
Good to know
- Only images acquired in Ekua are used: photos from your computer can't be uploaded. For new ones, take frames from your scans.
Map of the site
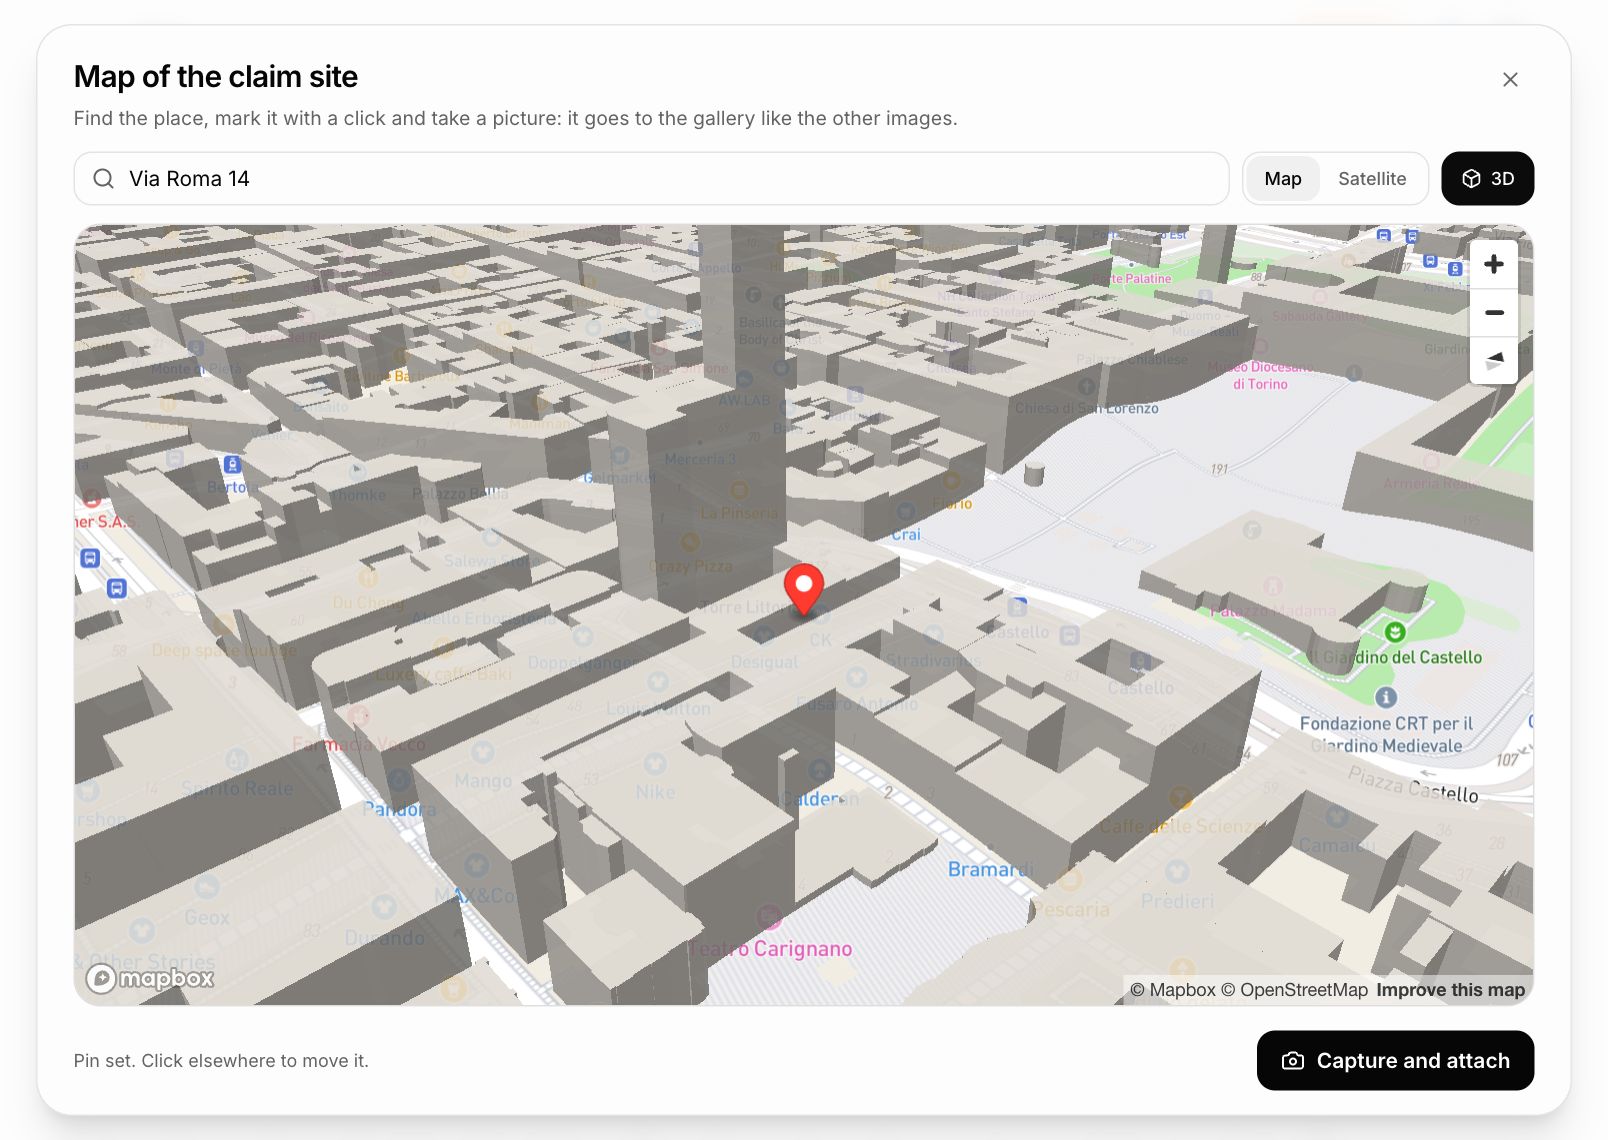
A map of the claim site, from which you capture an image for the gallery.
Where to find it
- Your appraisals
- Open an appraisal
- Appraisal
- Map of the site
How to use it
- 1
Open
On the Appraisal tab press the map button in the toolbar (Map of the site in imported documents).
- 2
Find the place
The map starts from the GPS position of the first scan that has one; otherwise search for an address or place.
- 3
Mark the spot
A click on the map drops the pin; another click moves it.
- 4
Capture and attach
The view, with the pin, becomes a gallery image.
What you'll find
3D
The map opens in 3D, tilted, with terrain and buildings in volume; right-click and drag to rotate it. The 3D button goes back to the top-down view.
Map or satellite
Two styles, which you can switch at any time.
Good to know
- Search works best with the full address and town: "Via Dante Alighieri 139, Sant'Elpidio a Mare".
- Maps are by Mapbox and OpenStreetMap, credited on the image.
Attachments
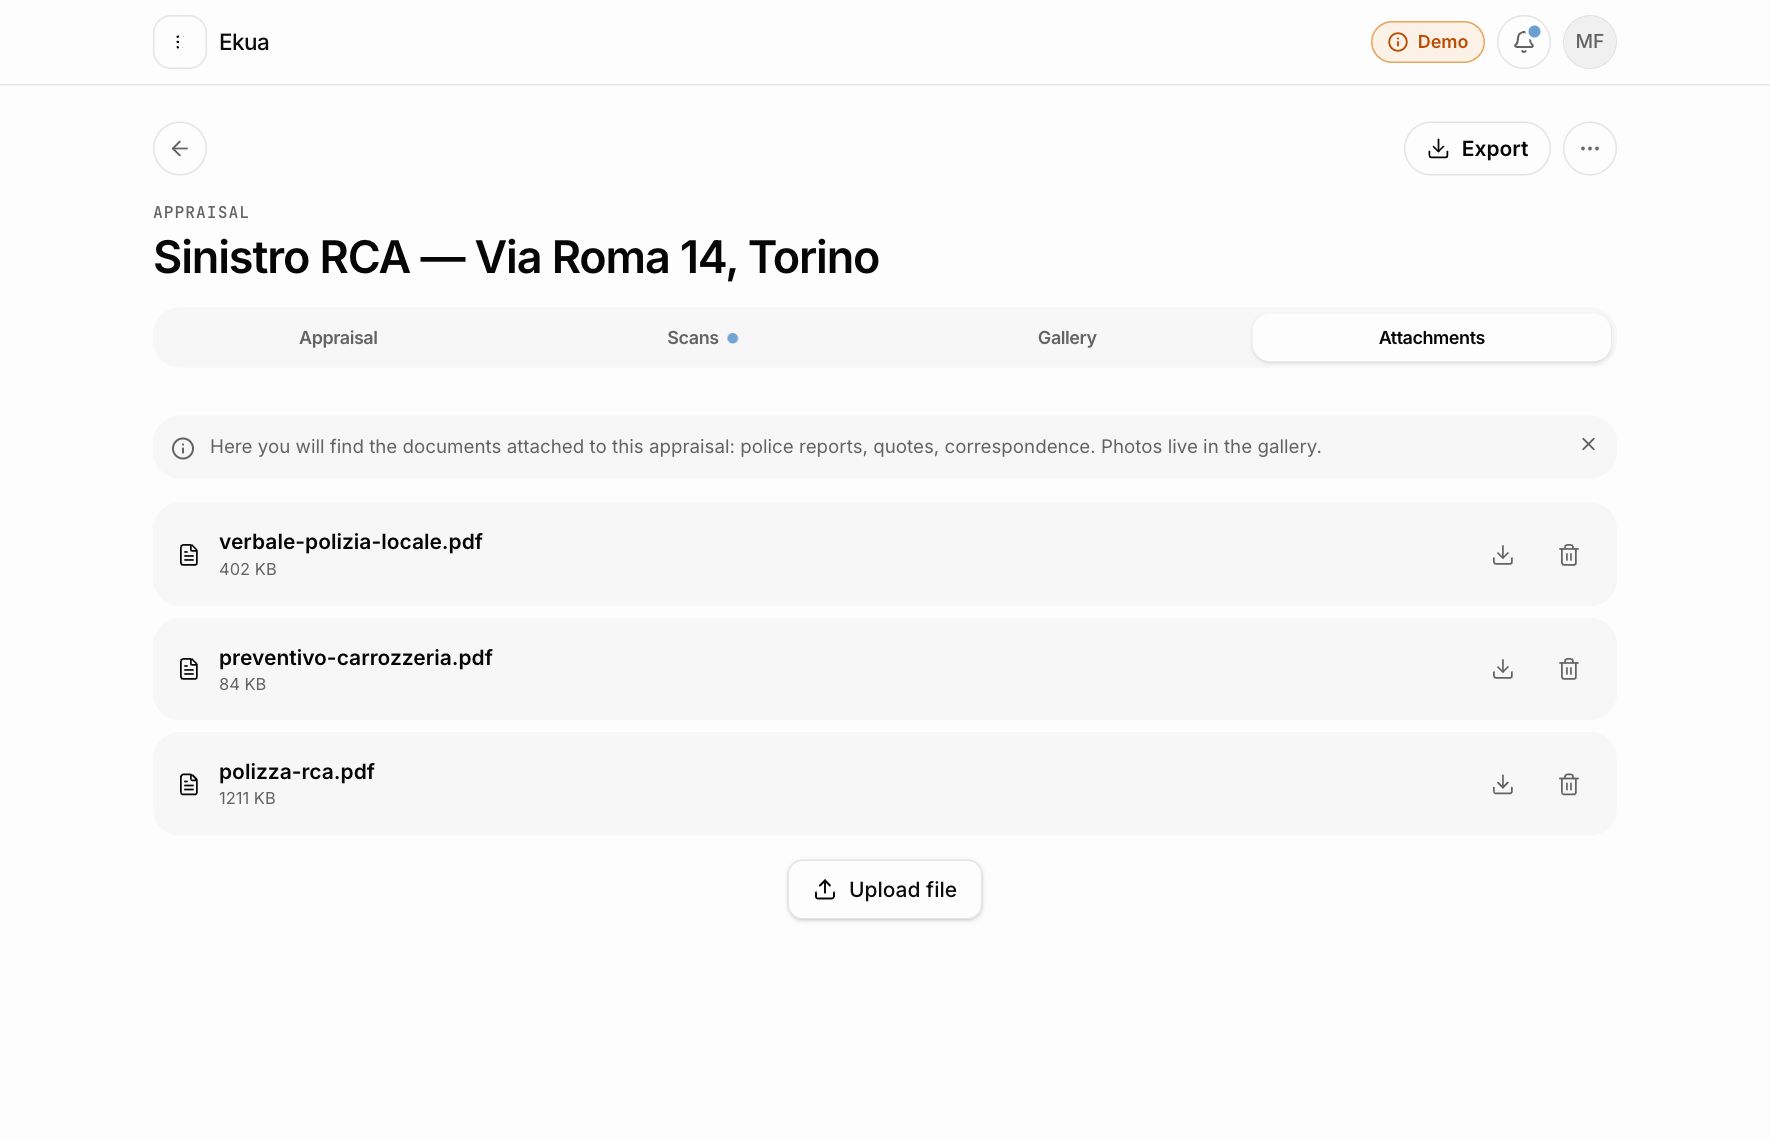
The appraisal's documents: reports, quotes, policies, correspondence.
Where to find it
- Your appraisals
- Open an appraisal
- Attachments
What you'll find
Upload files
PDF, Word, Excel and text files, from the button or by dragging them onto the appraisal. They can also be uploaded from the appraisal creation form.
Preview and download
PDFs can be read without downloading; other formats are downloaded.
Delete
From the document's menu.
Good to know
- Images don't appear here: they're in the Gallery.
3D scans
Scans
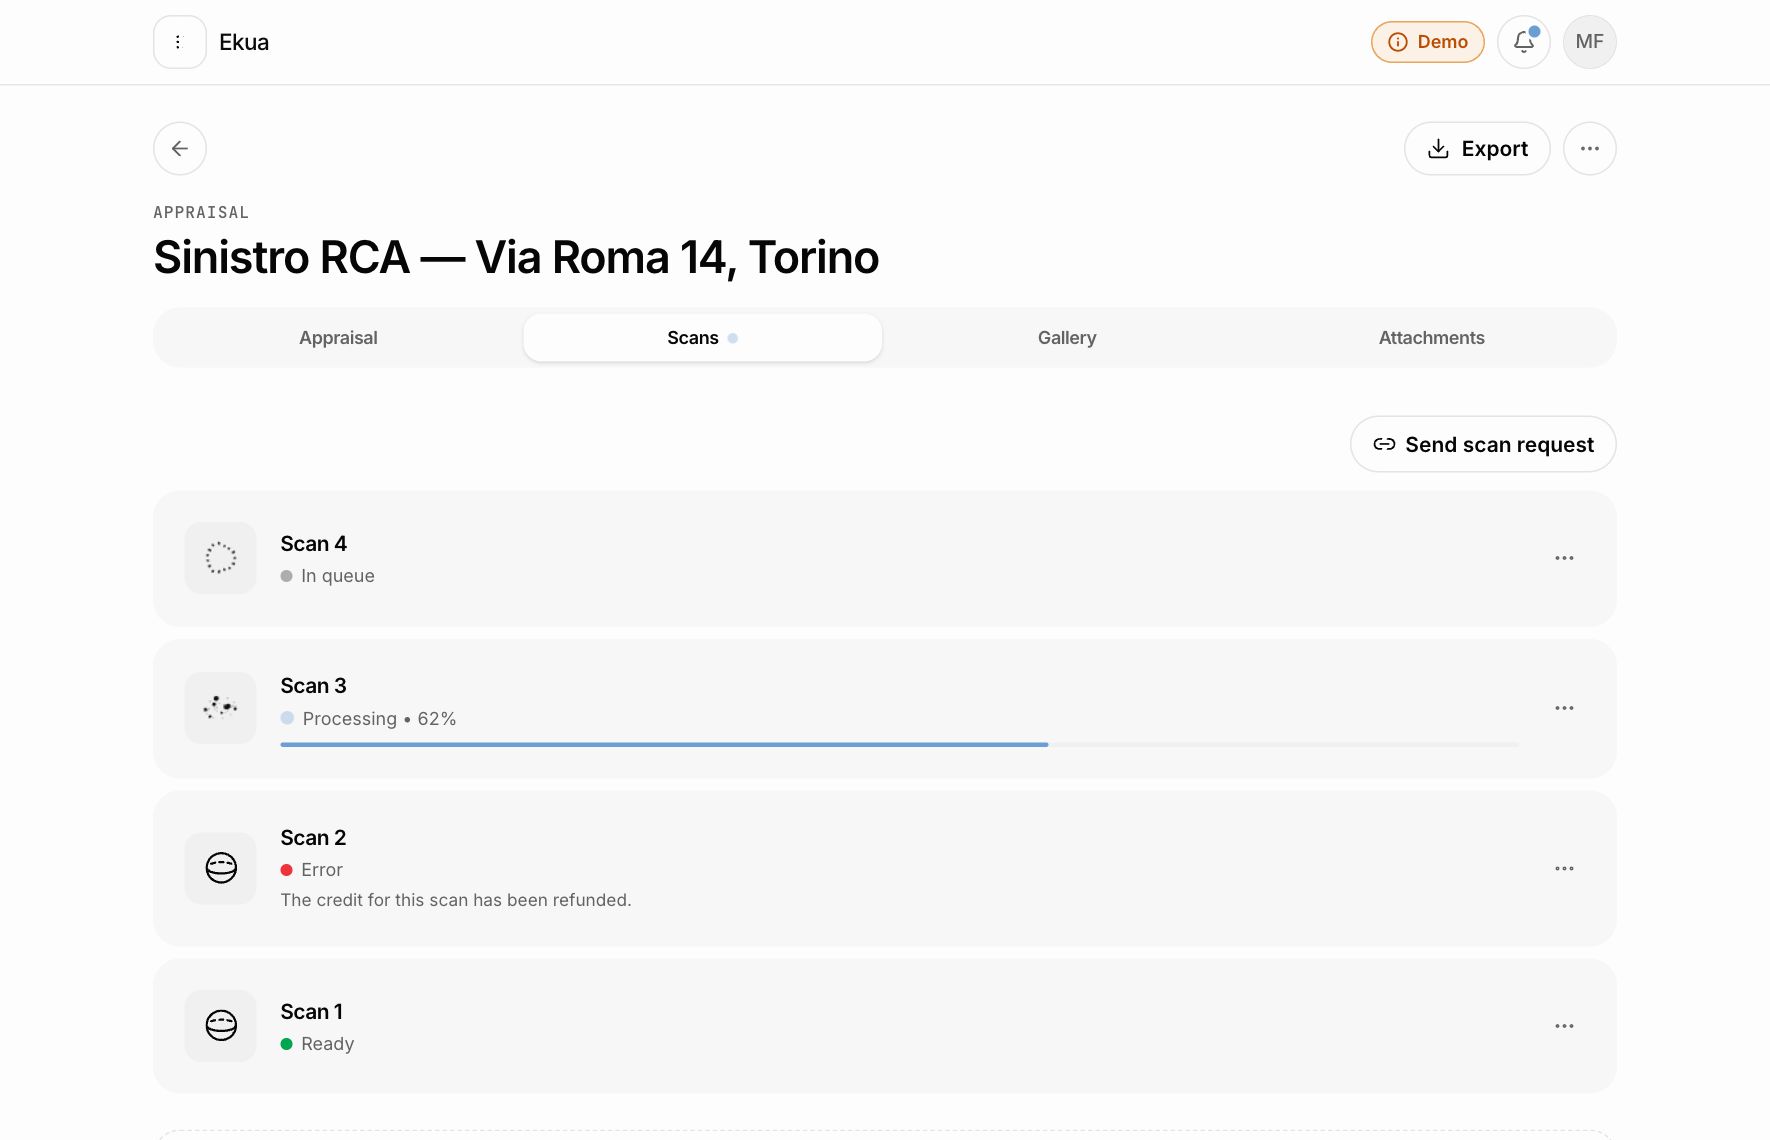
The appraisal's 3D scans, with the status of each reconstruction updated in real time.
Where to find it
- Your appraisals
- Open an appraisal
- Scans
What you'll find
Queued
The footage is uploaded and waiting for its turn to be reconstructed.
Processing
The model is being reconstructed: percentage and bar rise by themselves. You can close the page, the work continues.
Ready
The 3D model is available: the row opens the viewer.
Error
The reconstruction failed: the credit is refunded and from the ••• menu you restart it on the data already uploaded, without using another one.
End-of-scan notice
When a reconstruction finishes a notice appears, wherever you are on the platform, with a button to open it. Whoever started it also gets an email.
••• menu
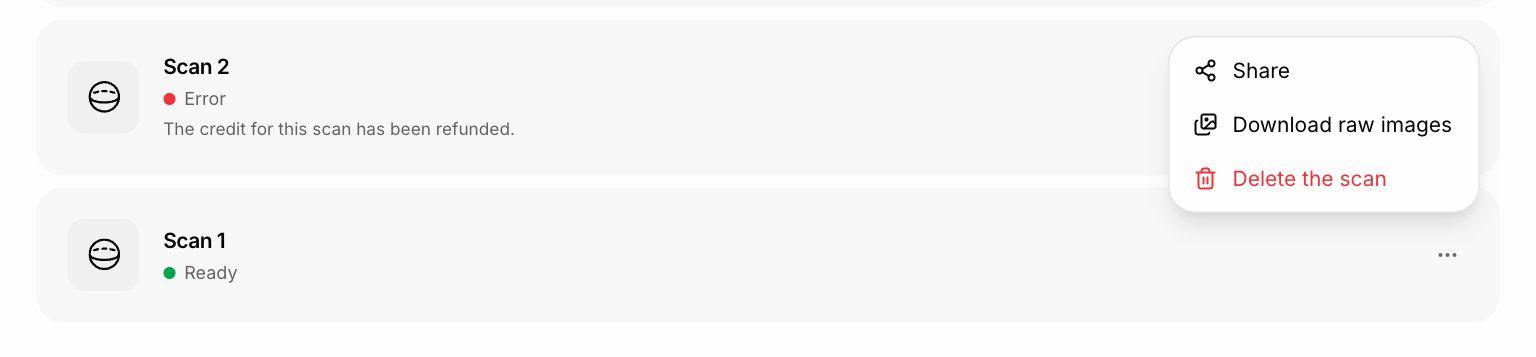
Share (ready scans), Download raw images (also while processing), Restart the scan (failed ones), Stop the scan (those stuck for more than fifteen minutes), Delete the scan (finished ones). An item only appears when it can be used; the same open with a right-click.
Good to know
- Hovering the status of a row explains what's happening.
- "Send scan request" is always there; "New 3D scan" only appears on phones and tablets, where capturing actually happens.
3D viewer
The reconstructed model is explored in the browser, and images for the appraisal come out of it.
Where to find it
- Your appraisals
- Open an appraisal
- Scans
- Ready scan
What you'll find
Exploring
Rotate, zoom and pan the model with mouse or fingers. The side arrows move to the previous or next ready scan.
Scan details
At the bottom left: anchoring, capture date and coordinates.
Screenshot
Capture the view, highlight the damage freehand, then save it to the gallery, attach it to the appraisal or download it.
Browser scanning
Capturing a 3D scan from the phone's browser, without installing the app.
Where to find it
- From a phone
- Your appraisals
- Open an appraisal
- Scans
- New 3D scan
How to use it
- 1
Start
On a phone, in the Scans tab, press "New 3D scan".
- 2
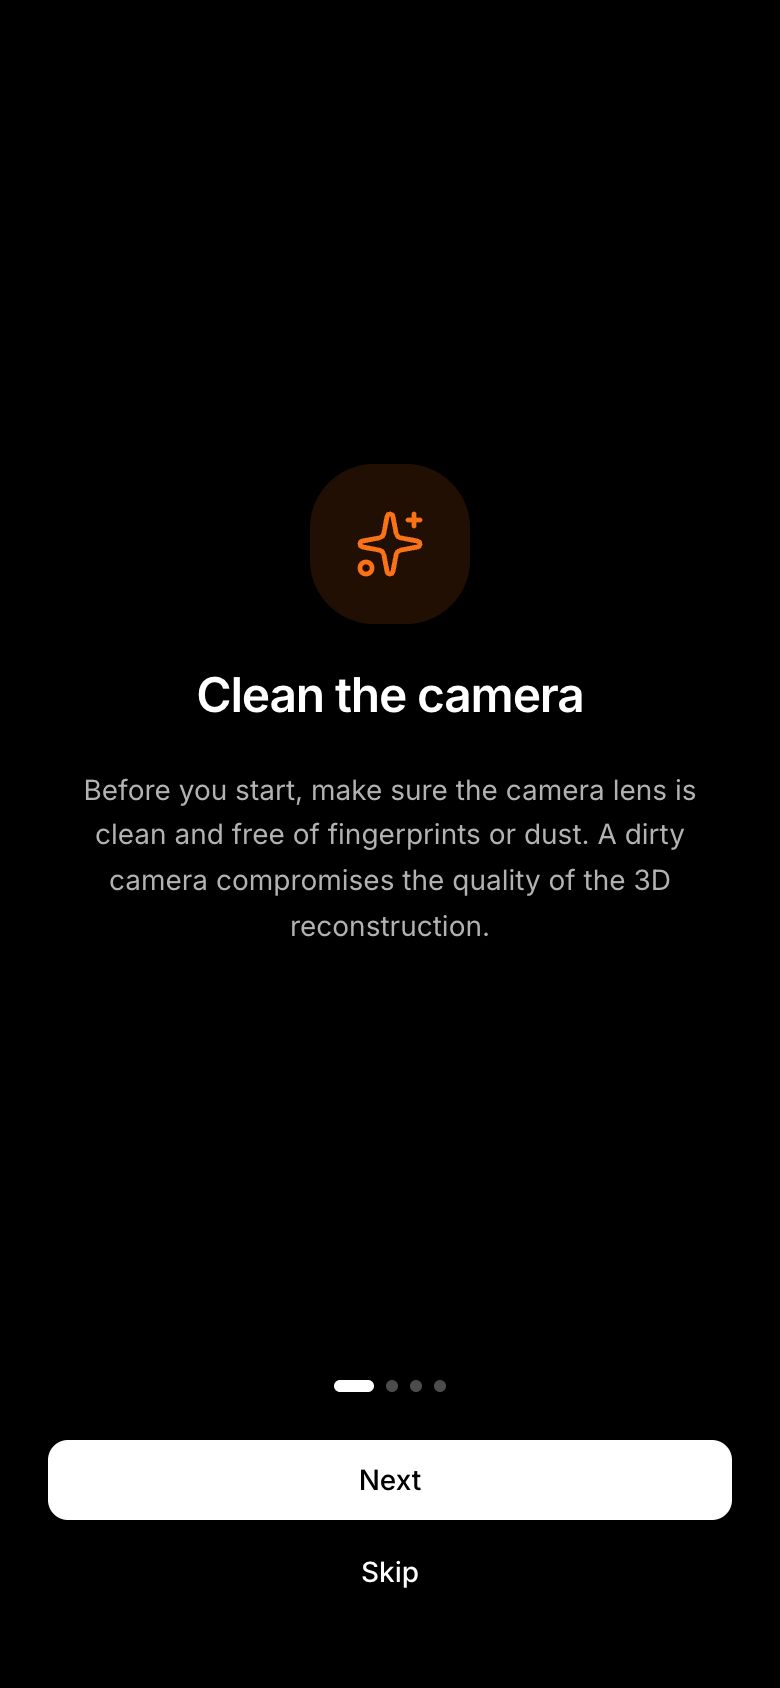
Guide
Before you start, a few screens recall what makes a good capture: a clean lens, the area in frame, slow movement.
- 3
Permissions
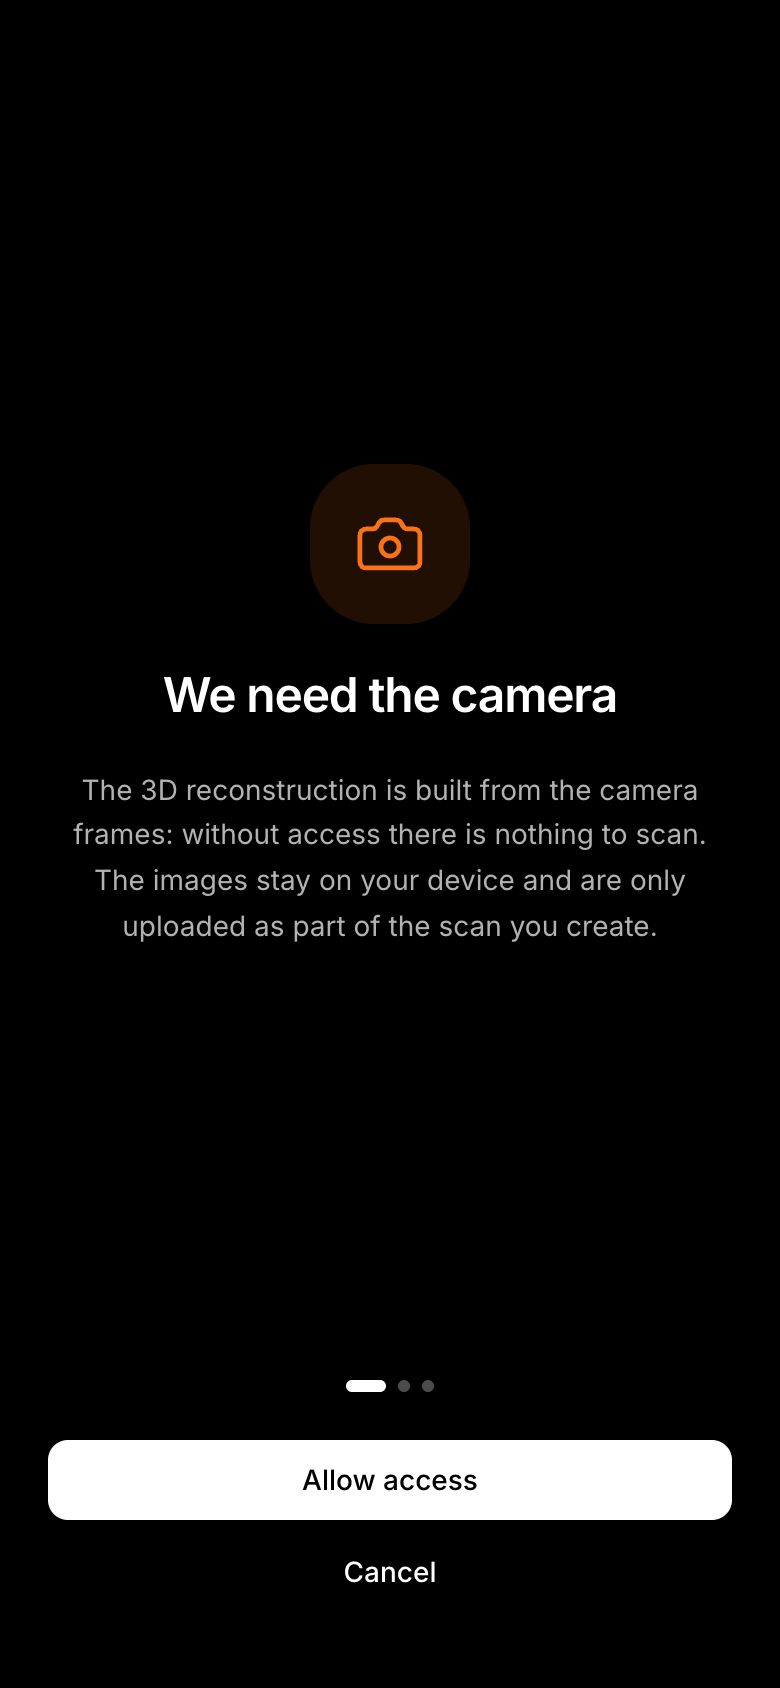
Then one permission per screen: camera, motion sensors and location. Each explains what it's for before the phone asks.
- 4
Ready
The frame appears under a blurred veil with a single button: "Start scan".
- 5
Hold the phone upright
Capture with the phone held upright, in portrait. Landscape is not supported yet: it is on the way.
- 6
Capture
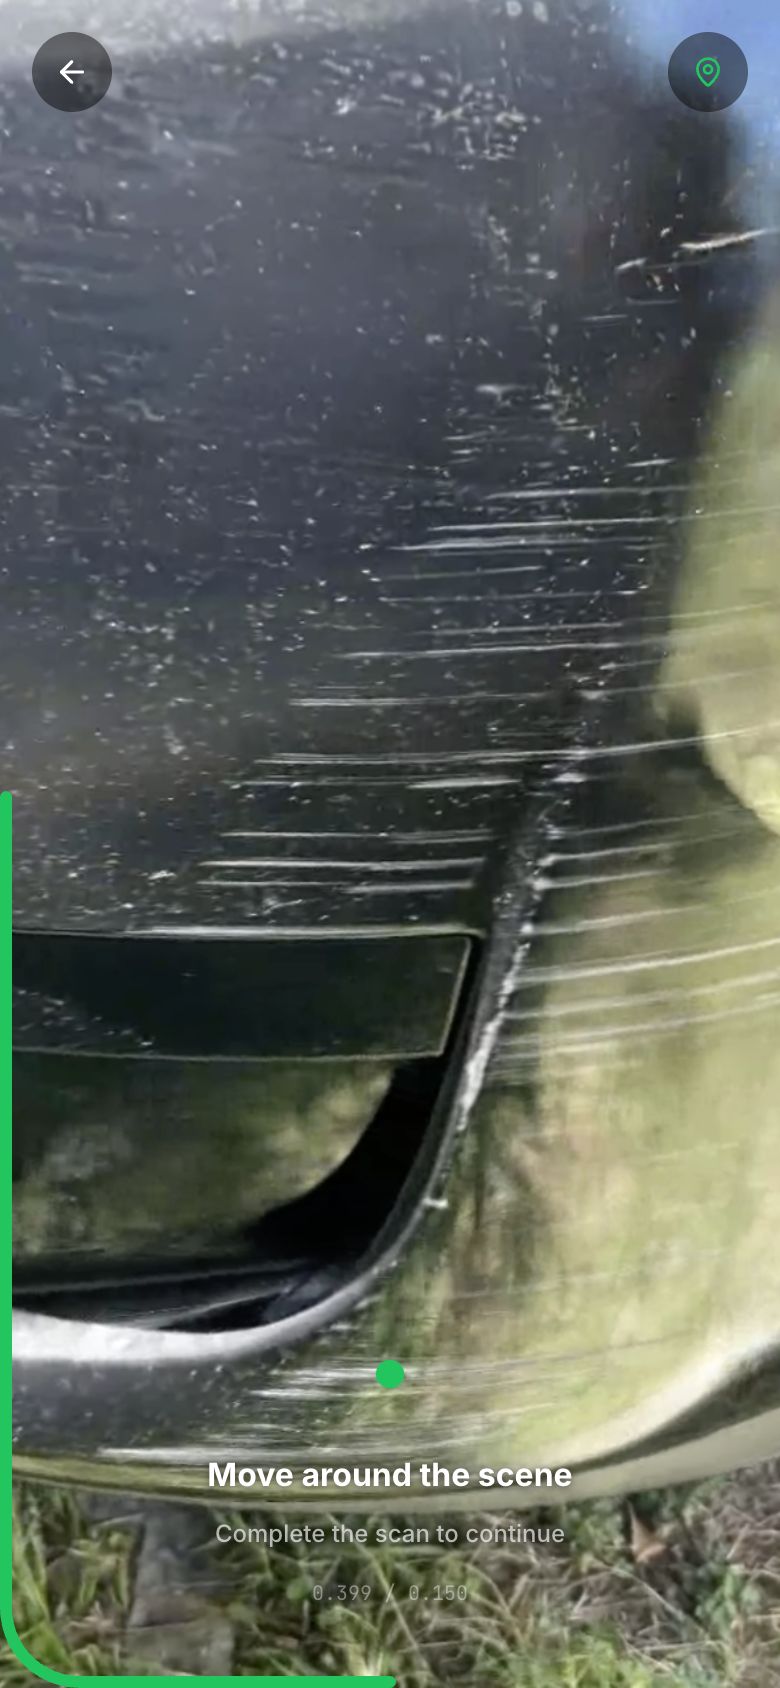
Move slowly around the scene. Each time the phone moves far enough a frame is taken: the dot in the middle pulses and, where supported, the phone vibrates. The ring along the edge fills up until the scan is complete.
- 7
Upload
The capture is assembled on the phone and uploaded. The data stays on the device until the server confirms it has it: if the connection drops the capture isn't lost, and the upload is retried.
Good to know
- If you stand still nothing is captured and the ring doesn't move.
- Every frame records time, phone orientation and location, if allowed.
- An up-to-date browser is required (Safari or Chrome). On a computer the button doesn't appear: Send scan request remains.
- Unlike the iOS and Android app, the browser has no augmented reality guidance.
Remote Scanning
Have the client capture the scan at the scene, without travelling there.
Where to find it
- Your appraisals
- Open an appraisal
- Scans
- Send scan request
How to use it
- 1
Send the link
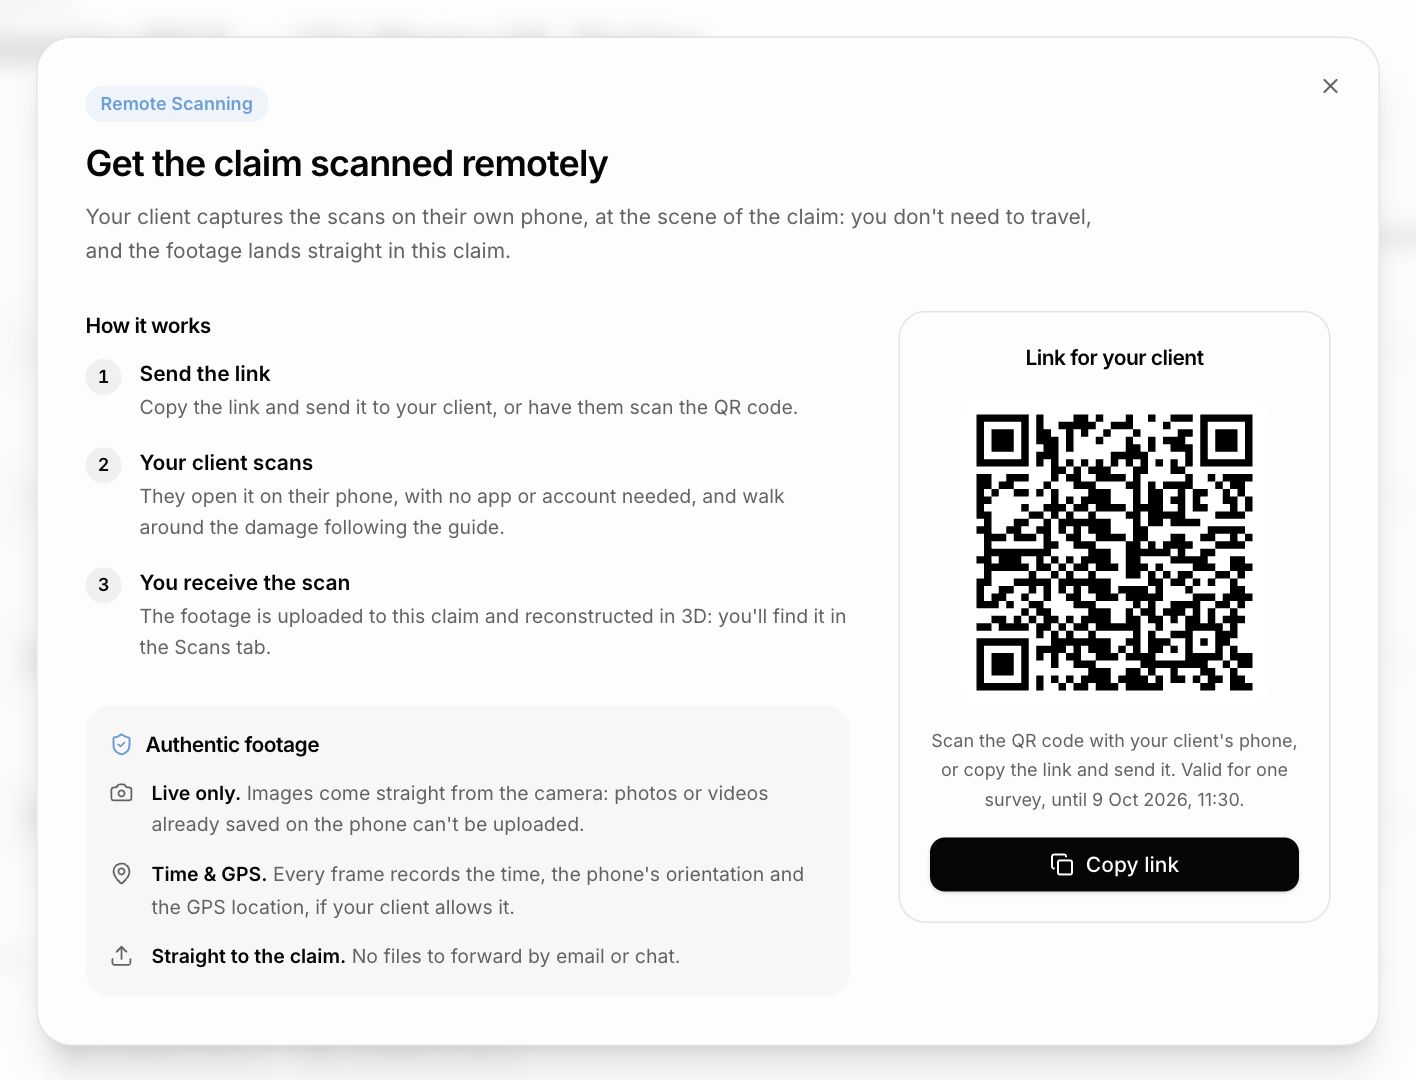
In the Scans tab press "Send scan request": copy the link and send it to the client, or have them scan the QR code.
- 2
The client scans
They open it on their phone, with no app or account: a short guide, the permissions, then the same capture as scanning from the browser.
- 3
Receive the scan
The capture arrives in the appraisal and is reconstructed in 3D: you'll find it in the Scans tab.
What you'll find
Live only
Images come from the camera: saved photos or videos can't be uploaded.
Time and GPS
Every frame records time, orientation and location, if the client allows it.
Straight into the appraisal
No files to forward by email or chat.
Good to know
- The link is good for a single survey and expires after 72 hours: the expiry is shown next to the link.
- It can only upload the capture to this appraisal: whoever opens it sees neither the appraisal nor your account.
- Send it only to the client concerned.
Frames from the scans
Images from a scan's footage, to add to the gallery as a reference for the appraisal.
Where to find it
- Your appraisals
- Open an appraisal
- Gallery
- Video
- Add to gallery
How to use it
- 1
Open
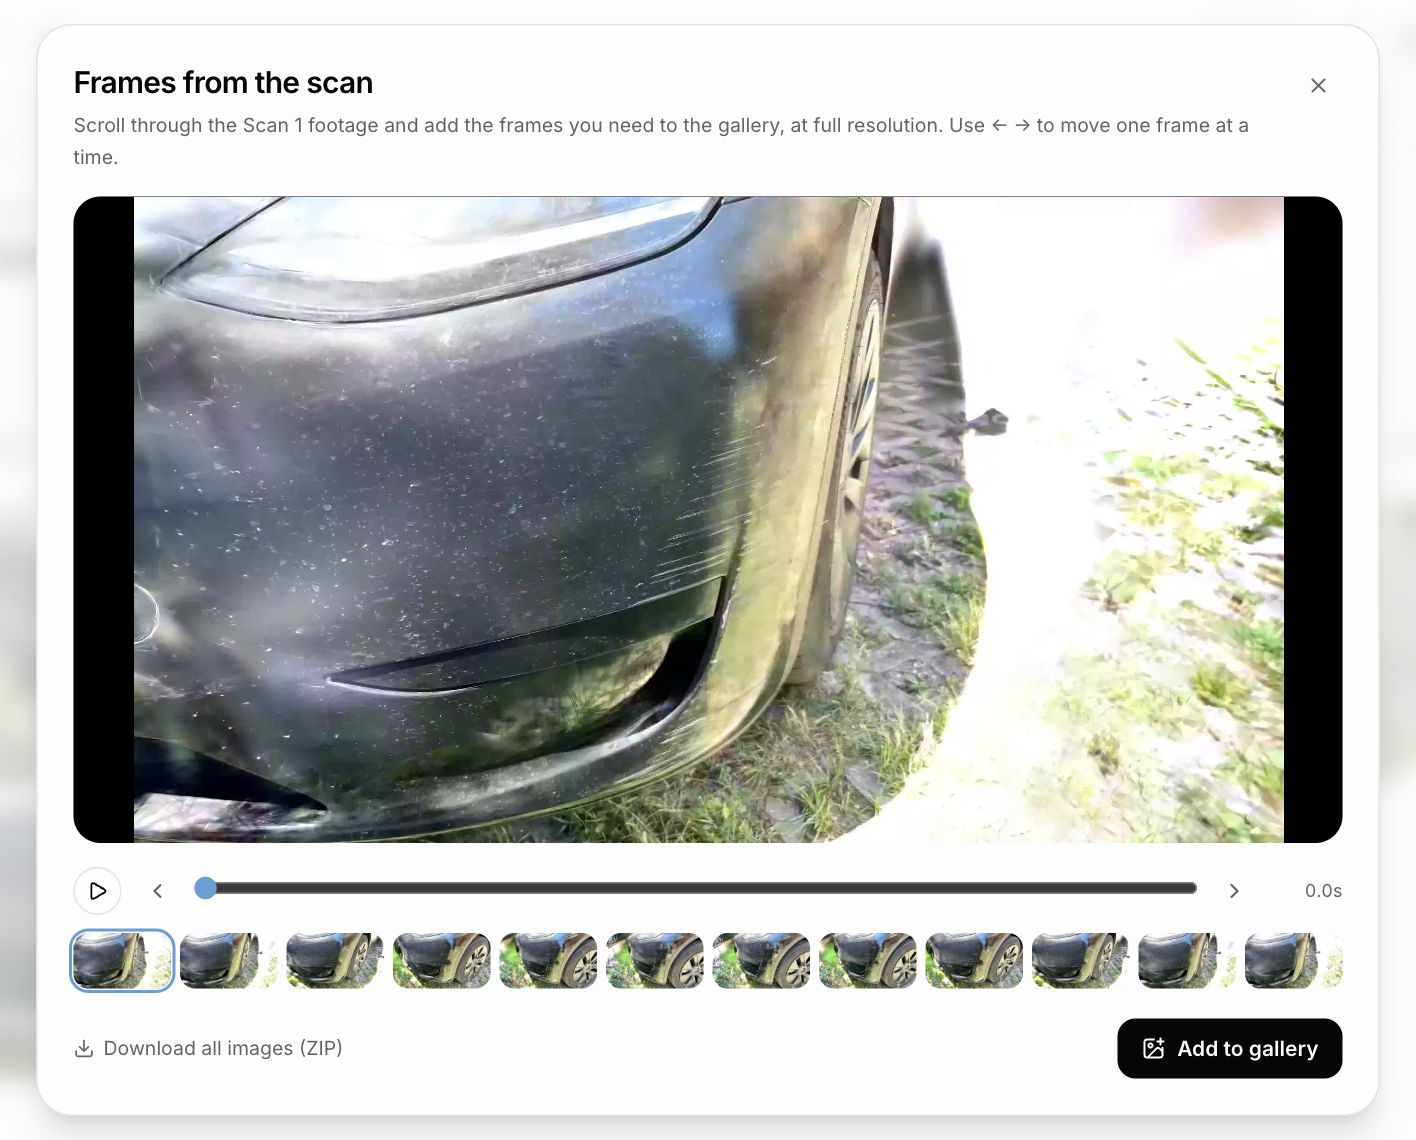
In the Gallery, open the scan's Video tile: hovering it shows the footage.
- 2
Find the frame
Scroll with the slider, jump with the thumbnails, or use the ← → arrows to move one frame at a time.
- 3
Add to gallery
The frame in view goes into the gallery at full resolution. Add as many as you need: the ones already taken are marked on the slider.
Good to know
- To get all frames at once, "Download all images (ZIP)" opens the same download as Raw images.
Raw images
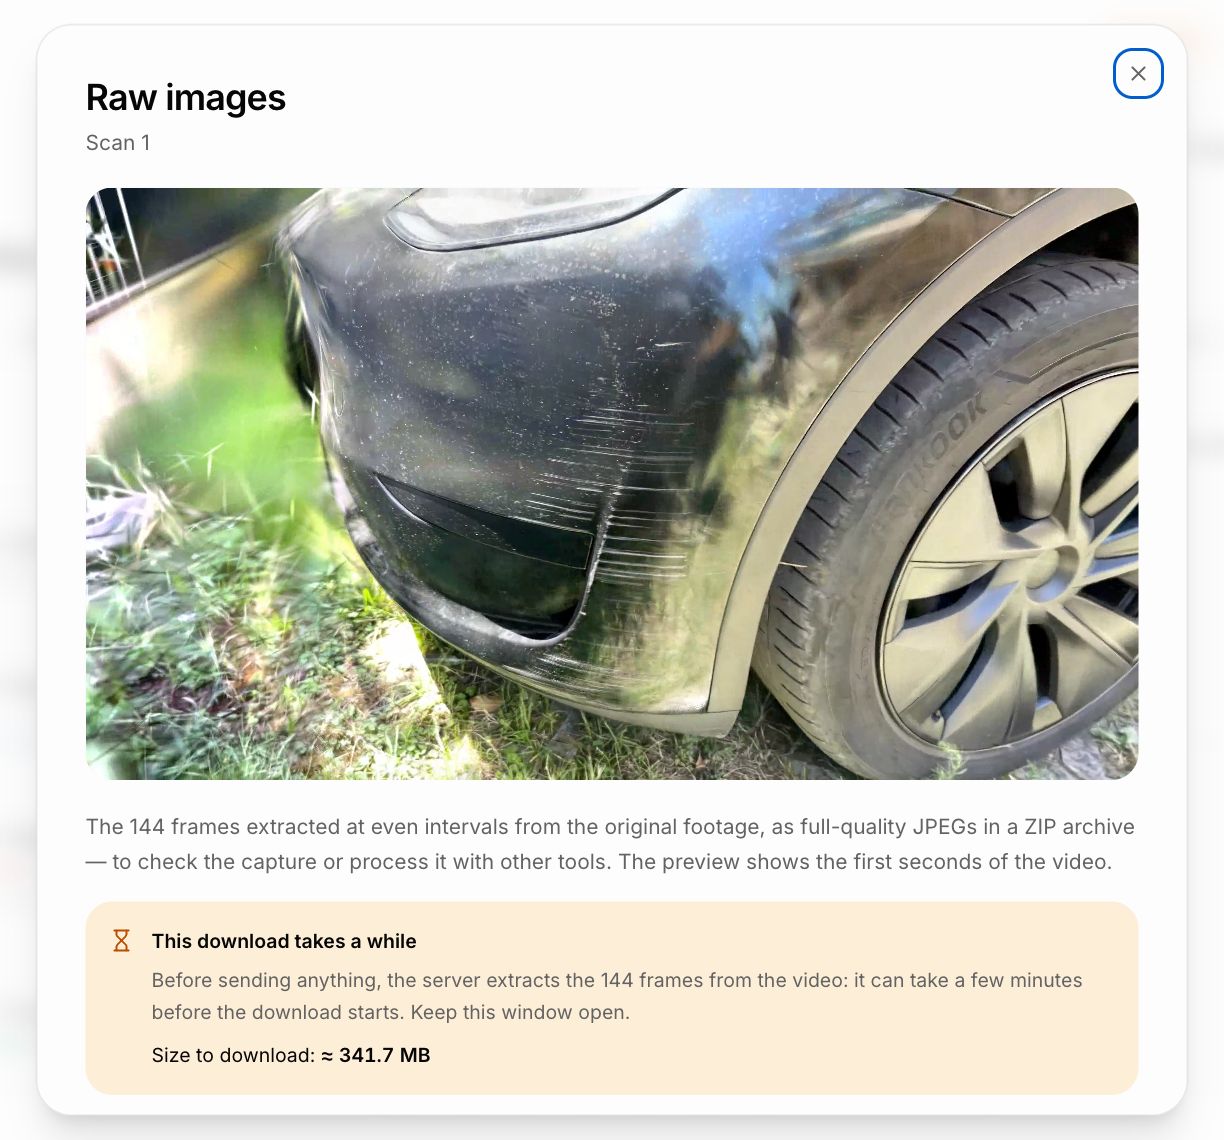
A scan's original frames, to check the capture or process it with other tools.
Where to find it
- Your appraisals
- Open an appraisal
- Scans
- •••
- Download raw images
How to use it
- 1
Open
From the ••• menu of a ready or processing scan choose "Download raw images".
- 2
Preview
The window shows the first seconds of the footage and the estimated size of the archive.
- 3
Download
The extraction of the 144 full-quality JPEG frames starts, collected in a ZIP archive.
Good to know
- Extraction can take a few minutes before the download starts. Keep the window open: closing it stops the download.
- Too many downloads in a row are limited for a few minutes.
- If you only need a few images, take them from the Gallery: see Frames from the scans.
Account
Credits
Each 3D scan costs one credit.
Where to find it
- Account menu
- Settings
- Credits

What you'll find
Balance
In Settings, Credits section.
Purchase
Credit packs are purchased from the Ekua app for iOS and Android. Administrators and appraisers can buy them.
Refund
If a reconstruction fails, the credit goes back to the balance automatically.
Good to know
- The balance belongs to the organization: everyone at the firm uses it.
Settings
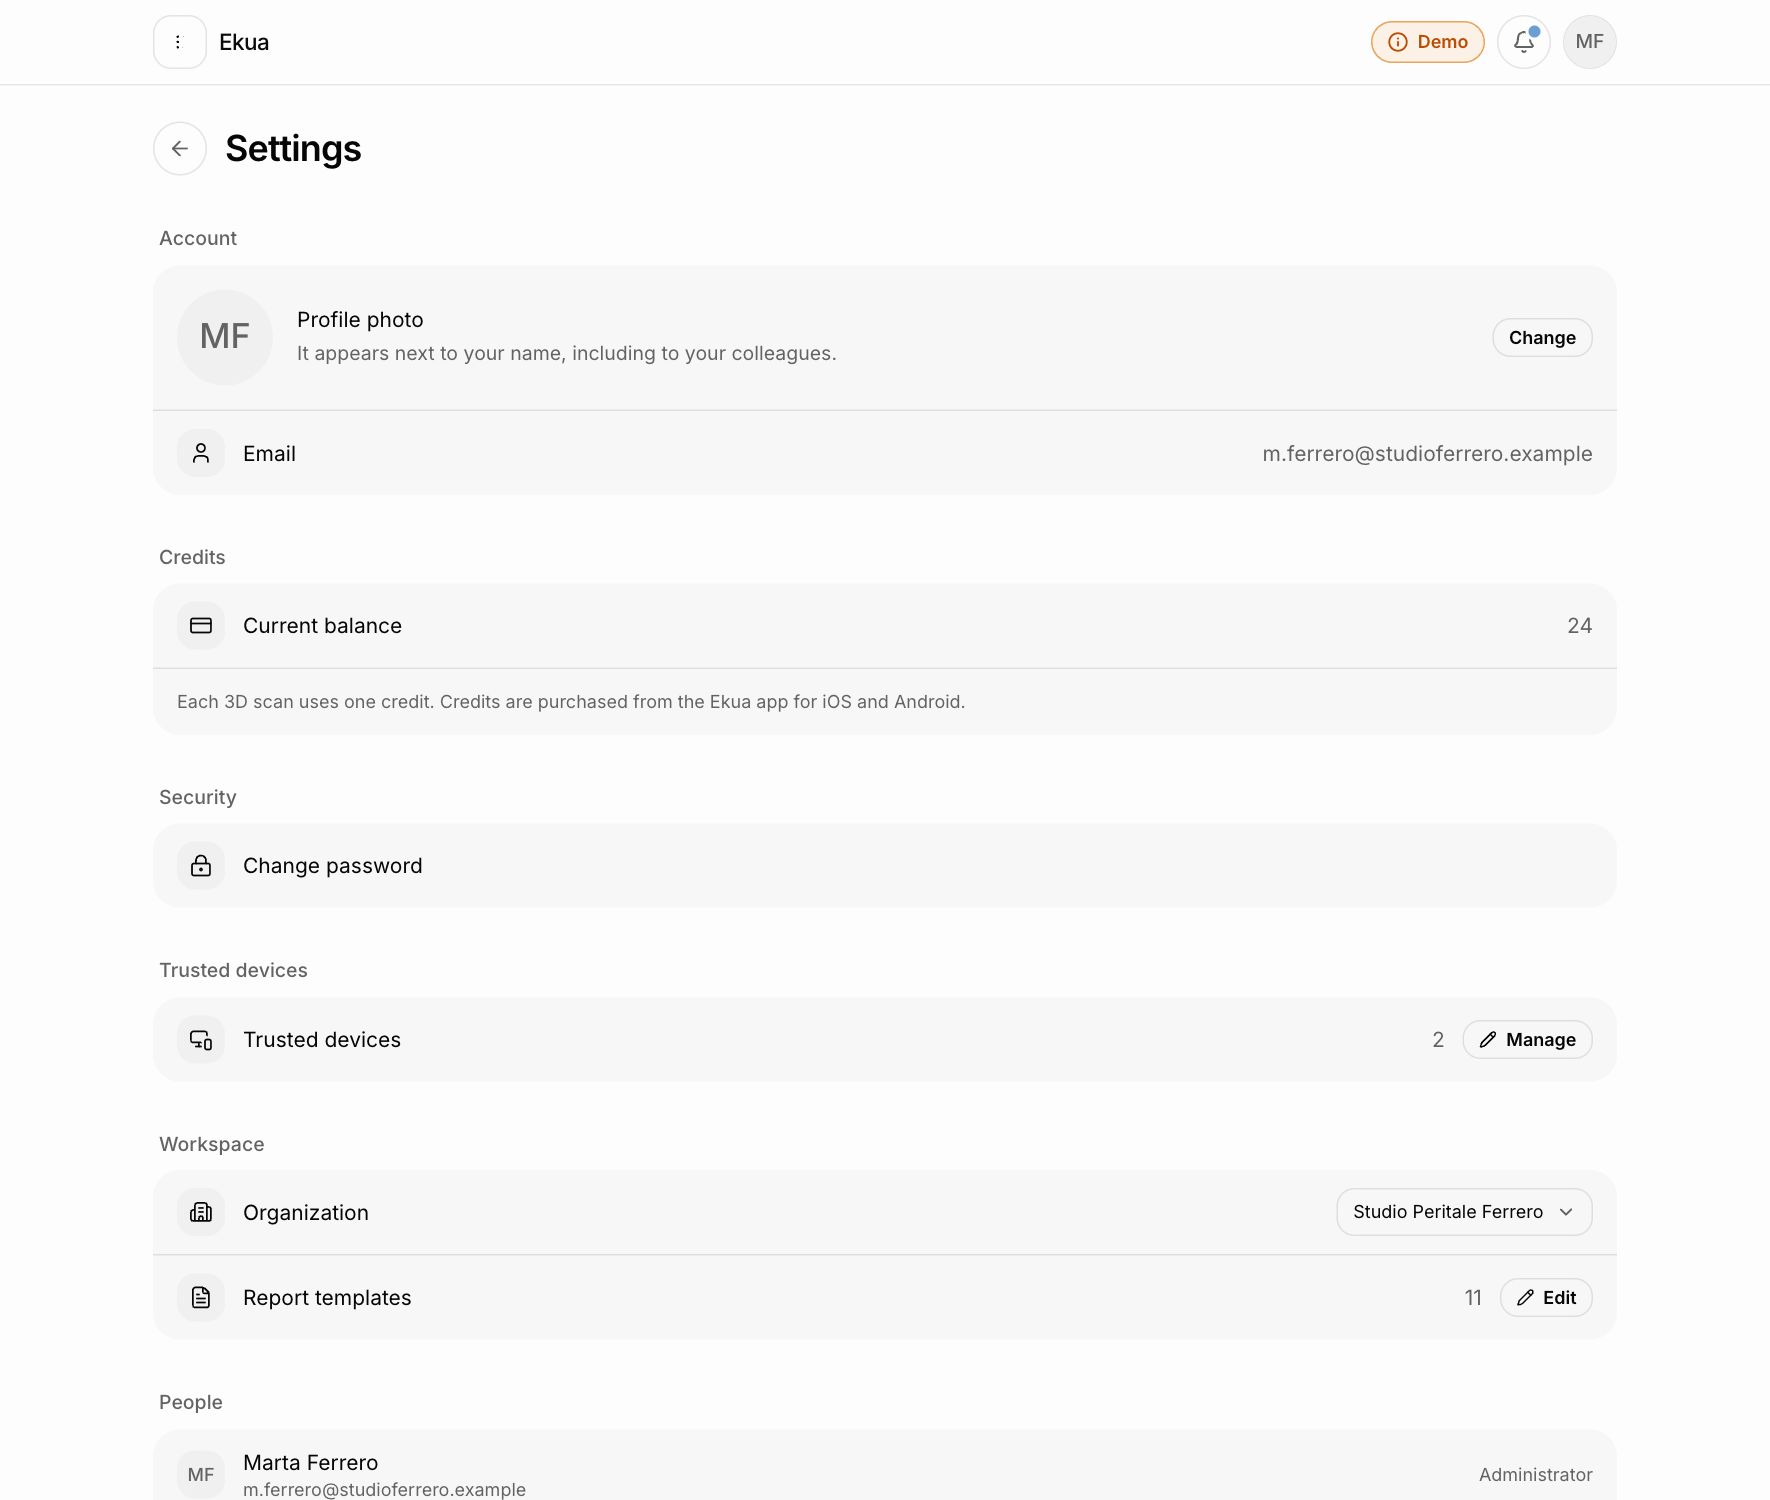
Account, credits, security, organization and preferences.
Where to find it
- Account menu
- Settings
What you'll find
Account
Profile photo and email.
Credits
The current balance. See Credits.
Security
Password change and trusted devices, managed in a separate window. See Security.
Workspace
The active organization, appraisal templates with how many are active, and the people. See People and roles.
Data
The region where the firm's appraisals, 3D scans and documents are stored: the one it was created in.
API
The keys to connect Ekua to the firm's software. See API.
Appearance
Language (Italian, English, German, Spanish) and, on desktop, opening appraisals full screen. The light or dark theme is in the account menu.
App and actions
Platform version, Sign out and Delete account (requires the password).
Good to know
- Moving data to another region is a migration done by the Ekua team: you need to ask for it.
Organisations
With the same account you can work in several firms, with a different role in each.
Where to find it
- Account menu
- Select workspace
What you'll find
Choice at sign-in
If you belong to more than one organisation, you choose which one to enter after signing in.
Switching
From the account menu, "Select workspace": appraisals, scans, templates and credits become those of the chosen organisation.
Separate data
Each organisation only sees its own data: nothing passes from one firm to another.
Good to know
- A role only applies in the organisation where it was assigned.
People and roles
Who belongs to the organisation and what they can do.
Where to find it
- Account menu
- Settings
- People
How to use it
- 1
Invite
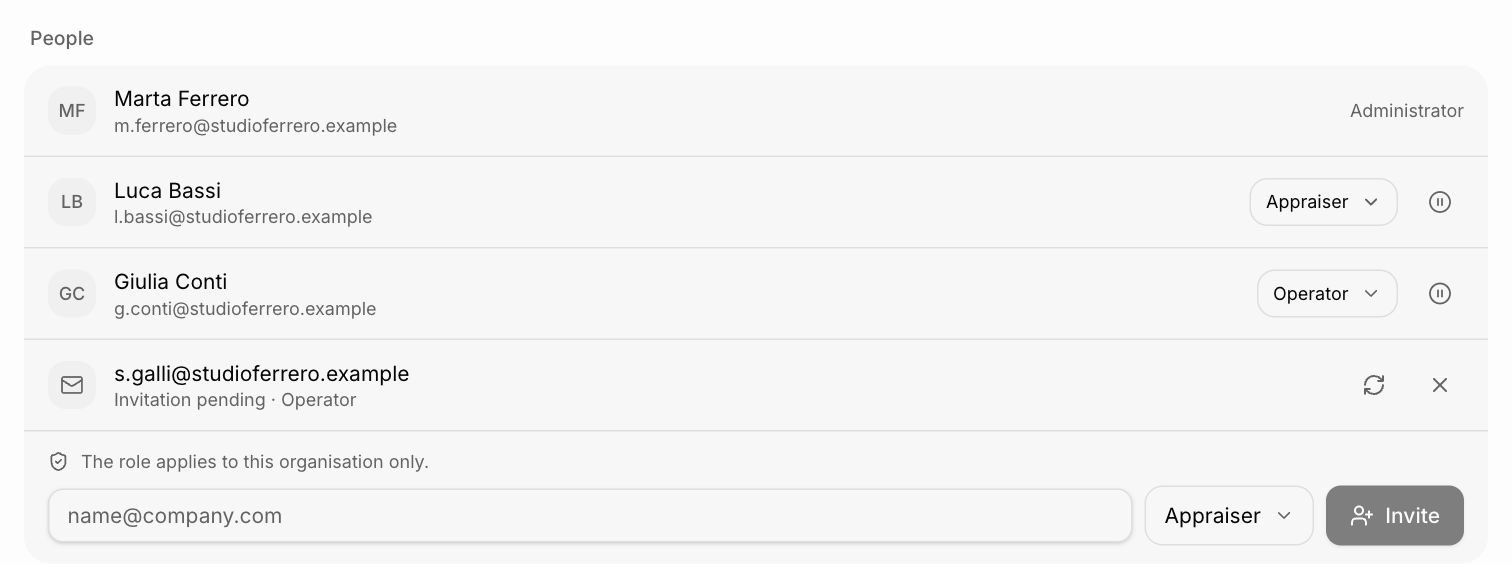
In Settings, People section, press "Invite": email and role. The invitation arrives by email.
- 2
Accept
Newcomers choose a password; anyone who already has an Ekua account signs in with theirs.
What you'll find
Administrator
Everything an appraiser does, plus the people and the organisation's settings.
Appraiser
Owns the appraisal: besides writing it, shares and deletes it, writes the organisation's templates and buys credits.
Operator
Works alongside the appraiser: creates and writes appraisals, uploads attachments and starts scans, but doesn't share, delete or buy.
Pending invitations
They stay in the list: resend or revoke them from there.
Change role
From the menu next to the person: it only applies in this organisation.
Suspend
A suspended person can no longer sign in, but stays in the list and can be reactivated when needed.
Good to know
- Only administrators invite, change roles, suspend and reactivate.
- An organisation must always have at least one administrator.
- An invitation is valid for 7 days: after that it has to be resent.
Security
Email code, remembered devices and password.
Where to find it
- Account menu
- Settings
- Security
- Account menu
- Settings
- Trusted devices
What you'll find
Email code
The first sign-in from a browser or phone asks for a 6-digit code sent to the account's email.
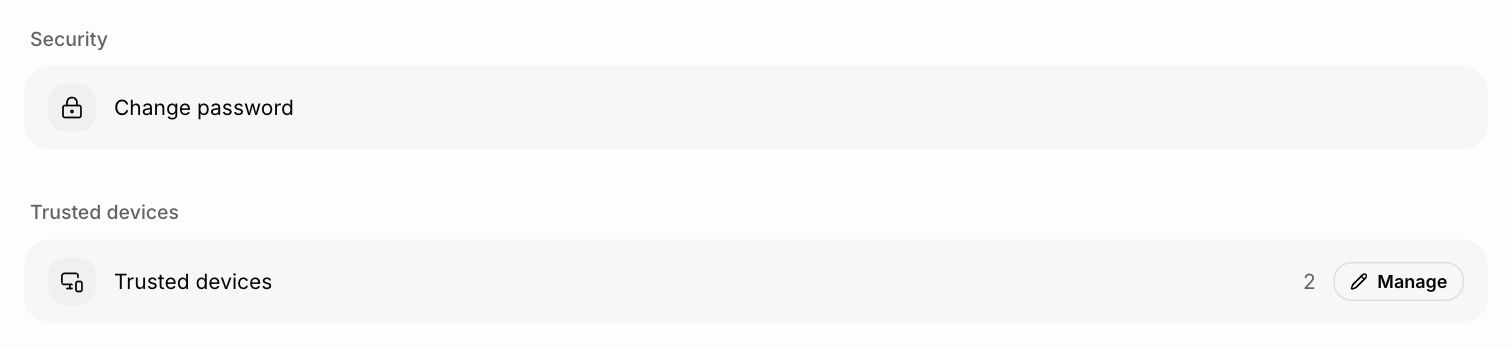
Trusted devices
With "Remember this device" the code isn't asked again for 60 days. In Settings the Trusted devices row shows how many there are; Manage opens the list with each one's last use: remove those you no longer use, or a lost phone.
Change password
You need the current password and an email code. Other sessions and remembered devices are signed out; the one in use stays open.
Good to know
- Removing the device you're using signs you out immediately: you'll need the code to get back in.
- In the browser a session lasts 8 hours, in the app 30 days.
API
Connecting Ekua to the firm's software, read-only.
Where to find it
- Account menu
- Settings
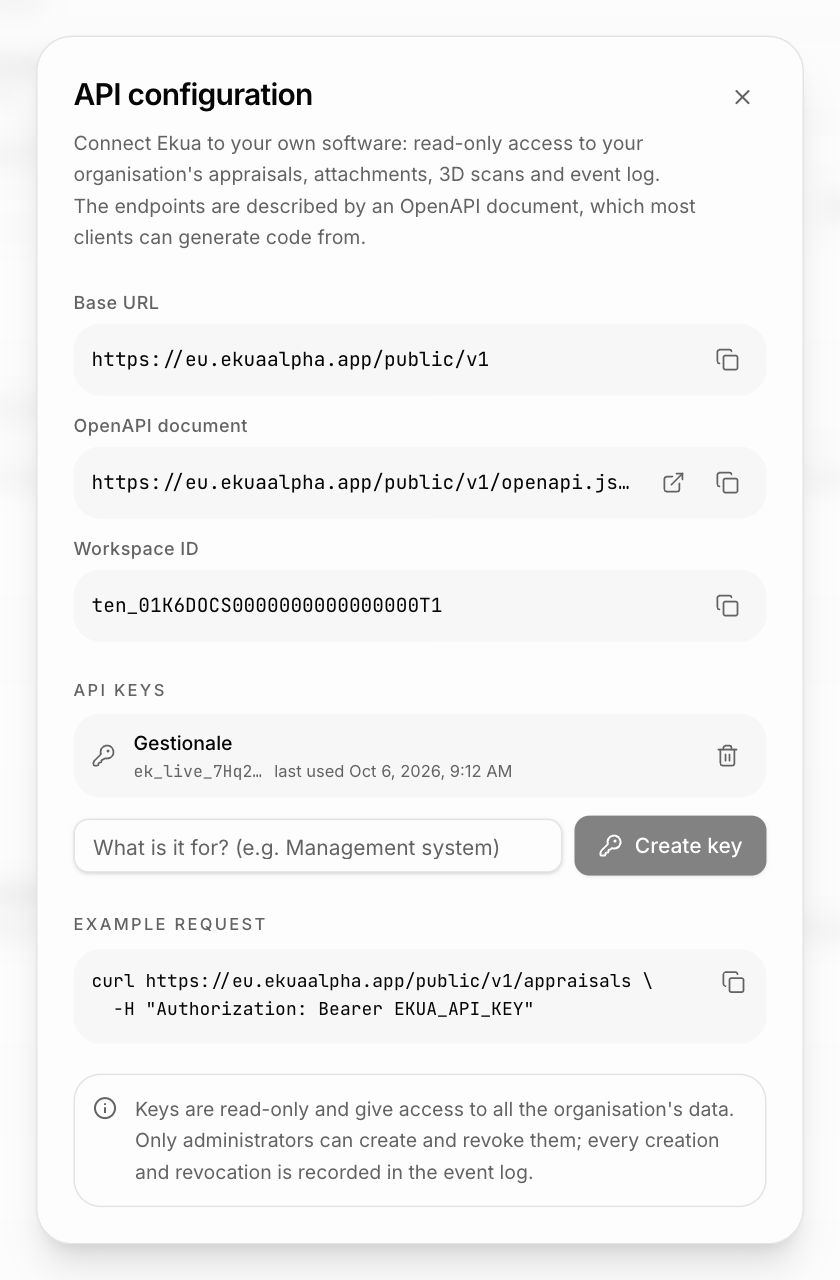
- API configuration
How to use it
- 1
Open
In Settings, API section, open "API configuration": base URL, OpenAPI document and workspace ID.
- 2
Create a key
Write what it's for, for example "Management system", and press "Create key".
- 3
Copy it straight away
The key is shown only this once: keep it somewhere safe.
What you'll find
What can be read
The firm's appraisals, attachments, 3D scans and event log. No key can change the data.
Revoke
A revoked key stops working immediately. The list shows when each key was last used.
Good to know
- Only administrators create and revoke keys; every creation and revocation goes into the event log.
- If you lose a key, create a new one and revoke the old one.
Public links
Share an appraisal or a single scan with someone who has no account.
Where to find it
- Your appraisals
- Open an appraisal
- •••
- Share
- Your appraisals
- Open an appraisal
- Scans
- Ready scan
- •••
- Share
What you'll find
Appraisal
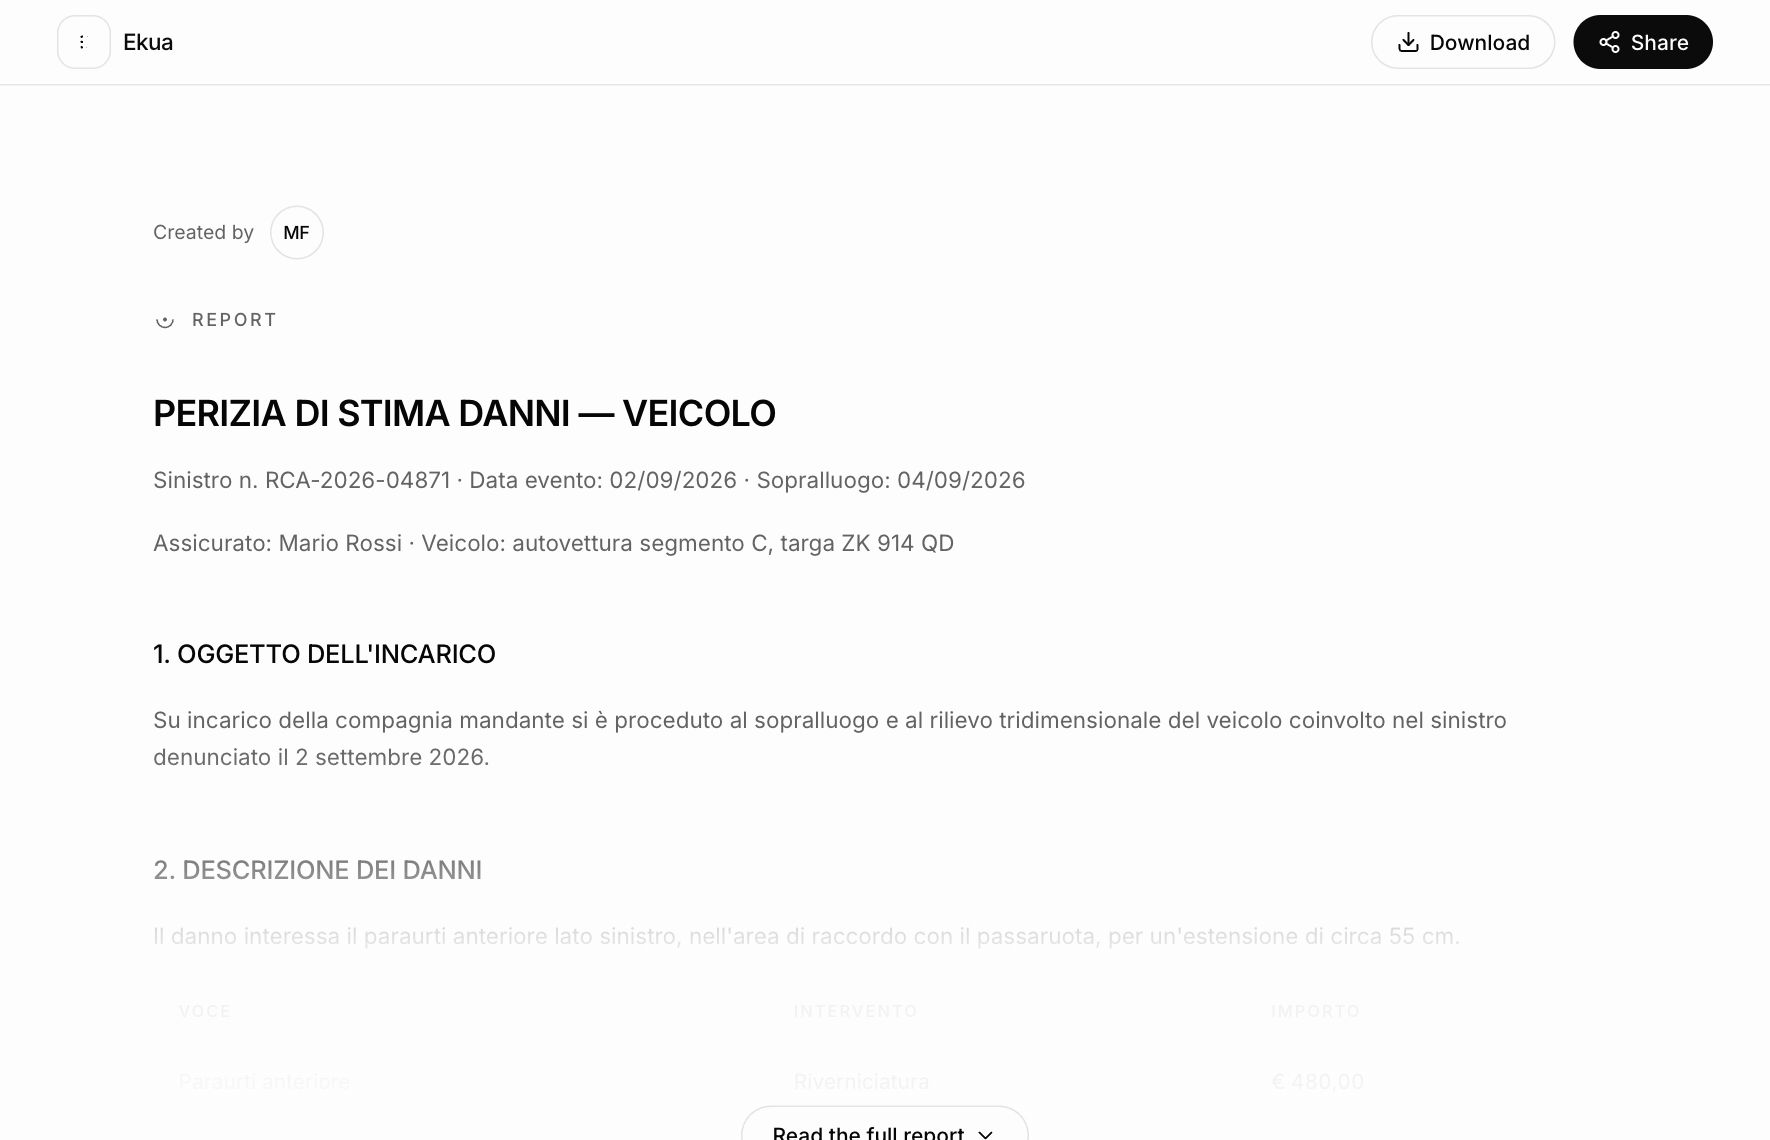
Share copies the link to the public page on ekua.app: text, 3D scans, images and attachments, read-only, with the name, photo, role, email and firm of whoever signs it.
Scan
From a ready scan's menu, Share copies the link to the page with the 3D models alone, with their details.
Scans in progress
A scan that isn't ready yet appears with its status and percentage, and the 3D model opens on its own as soon as it's ready. A failed scan says so, instead of opening an empty viewer.
Good to know
- Anyone with the link can open the page: share it only with people who need to see it.
- Sharing a scan makes the appraisal public: whoever has the 3D models link can also reach the rest.
- Sharing again returns the same link: the ones already sent keep working.
Suggestions
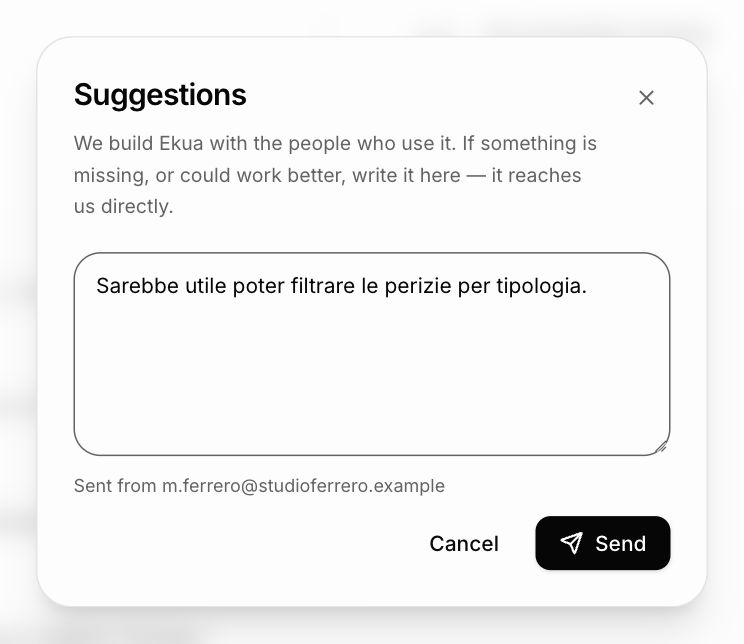
Tell the Ekua team what's missing or what could be better.
Where to find it
- Your appraisals
- Suggest an improvement
- Your appraisals
- Open an appraisal
- •••
- Suggest an improvement
How to use it
- 1
Open
From the Suggest an improvement tile on the home page, or from an appraisal's ••• menu.
- 2
Write
Describe what you need or what doesn't work as you expect.
- 3
Send
The message reaches the Ekua team with your address, so they can reply.
Good to know
- In the app the same item is in Settings, and every now and then the app suggests it from the home screen.
Demo mode
This version of Ekua is a demo: the "Demo" badge is the reminder. The one below is the real badge: open it.
Where to find it
- Demo
- Account menu
- Settings
- Demo
What you'll find
Limited features
Because of licensing limits some features are restricted or not fully functional.
Verification signatures
For security, images and 3D models don't carry the cryptographic signature that certifies their integrity in the full version.